With the imminent release of Final Cut
Pro 4, with its attendant 16 gig install, many of us have found
that our boot partition is no longer big enough. Now is a good
time to get your boot drive ready for FCP 4--or it could be that
you simply want to partition a second non-boot drive.
Partitioning a Mac OS X (Jag) Boot drive.
1.
Insert your Mac OS X installer CD into the drive. Restart your
Mac while holding down the 'c' key on your keyboard to boot from
the installer CD.
2.
When the OS CD installer dialog box launches double click on
the 'Install Mac OS X' icon. At this point you do not want to
install so do not click on 'continue'.
3.
From the menu bar at the top of the screen click on Installer,
slide down to Disk Utility. This will open the Disk Utility program.
Click on the Partition tab and select the drive that you want
to partition.

4.
In the 'Volume Scheme' drop down, select the number of partitions
you want to have.

5.
For this example I have selected 2 partitions. I also have the
"Install Mac OS 9 Disk Drivers" box checked. These
drivers should be installed for machines that can boot into OS
9. If OS 9 drivers aren't present on the drive, you can't mount
that drive from a machine running OS 9. If you want to boot into
OS9 from this drive, or access it while booted into OS 9 from
another drive/partition, its imperative that you install OS 9
drivers when you initialize or partition. Even for systems that
don't boot into OS 9 it is a good idea; its possible to mount
such a drive via Firewire T mode from another machine, which
can come in handy in rare maintenance situations. It doesn't
hurt to have those drivers there, and it might actually help
one day.

6.
Click in the top partition box to select it (red arrow below).
Then enter a name for this partition, blue arrow.
7.
Next using the 'Format' drop down menu select "Mac OS Extended"
(green arrow below). In the Options Box check the 'Install Mac
OS 9 Disk Drivers', yellow arrow.

8.
Now repeat this process for all additional partitions.

9.
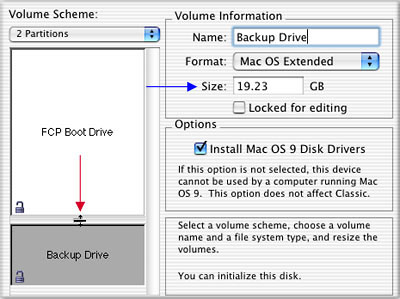
Now that you have named your partitions it's time to size them.
Place your cursor in between the two partitions, it will turn
into a up/down arrow. Click and drag up or down to change the
size of the partition, (red arrow below). As you drag, the new
size of the partition will be reflected in the 'Size' box, (blue
arrow below).

10.
Once you have named, sized, selected 'Mac OS Extended' Format
and 'Install Mac OS 9 Disk Drivers' for all partitions, click
on the Partition button. Your drive will be partitioned. This
process will only take a few seconds. Be aware that when you
partition a drive all information on that drive will be lost,
so be sure to back up any data that you wish to preserve.
Once the partitioning process has been
completed return to the Mac OS Install dialog box and click continue.
Select the partition that you want to install the system on and
continue.
Partitioning a Mac OS X (Jag) non-boot
drive.
Partitioning a non-boot drive is a bit
simpler. You do not need to start up from the Mac OS X installer
CD. Simply open your Hard drive > Applications > Utilities
> Disk Utility. With the Disk Utility program open select
the Partition tab, select the drive and start with step 4
(above).
A Word of Caution. Mac OS X has UNIX at its core. There is one
keyboard item that is reserved for Unix exclusively. It is the
forward slash, "/". Never use the forward slash in
the name of a drive or partition, file, folder, bin, project,
sequence or anywhere else for that matter.
Enjoy,
--ken
copyright © www.kenstone.net 2003
Recommended Reading
Care and Feeding of Jaguar - OS X Drive Maintenance - By Charles Roberts
Excerpt:
"With the leap to OSX, many have been left in complete confusion
about how to keep their Mac OS in shape. No Desktop rebuilding?
No inits to troubleshoot? Of course, we all KNOW better than
to believe that we should no longer worry about periodic maintenance.
Mac OSX Jaguar doesn't look or act like the so-called "old
world" Mac OS's, OS 9. It is built on a UNIX system that
administrates itself. That UNIX core gives it the ability to
repair and maintain itself to a limited degree.
So what do you do? You guessed it. Ya
still have to do a regular maintenance routine to keep things
in order. The good news is that this is very simple stuff and
much of it can be automated, except in the most extreme situations.
What follows is a good system to follow on a weekly basis to
make your editor bullet-proof, or at least easy to restore in
case of disaster." More
This
article first appeared on www.kenstone.net and is reprinted here
with permission.
All screen captures and
textual references are the property and trademark of their creators/owners/publishers.