|
|
   
|
Why
are my FCP Productions Darker on my clients PC's?
|
May, 2003
Why
are my FCP Productions Darker on my clients PC's?

No Gamma Correction |
|

Gamma Correction |
By James
Diefenderfer and Philip
Hodgetts
This is one of the most posted questions
on all FCP forums. It is most often posted by new editors or
editors that are providing their first production for a PC client.
Full disclosure - it was one of James' first post (Aug 01) as
well after he had spent a wicked week editing his first FCP production.
Wicked because it was frustrating and exciting all at the same
time only to end up in complete darkness about why his fabulous
production was way to dark on his clients Windows based PC. After
all, he had done everything correctly; selected only the best
shots, previewed on a NTSC color calibrated monitor and even
used FCP's broadcast safe filters.
So, what went wrong? His attempt
to 'wow' his client was foiled by the Gamma Monster. Sure, we
all know who that is, don't we? Nope, he did not and he is not
ashamed to admit it, after all acknowledge is the first step
to recover, isn't it?
James is and always will be a Mac-head
and while the world in his head is a wonderful one he has had
to admit that not everyone has seen the light. If he wants to
continue working in the Production Industry he must continue
to try to understand the difference between the two dominate
platforms which brings us, finally, to what he has learned about
the Gamma Monster so he can better deal with it's attempt to
sabotage his productions.
Gamma
- Gamma is the curve that describes
how the middle tones of images appear on a computer. Gamma is
sometimes confused with brightness and/or contrast. Changing
the value of the gamma affects the mid-tones while leaving the
whites and blacks unaltered. Gamma adjustment is often used to
compensate for the differences between Mac and Window video cards
and displays. (Apple Computer Inc. (2001), Final Cut Pro 2 User's
Manual, pg. 1371.)
- Images are brighter on a Macintosh
computer than on a Windows machine. ... As a consequence, you
need to view your images (productions) on both a Mac and Windows
computer, or at least on a Mac with gamma correction On (Mac
standard) and Off (Windows standard), and adjust your images
brightness so it doesn't look horrible on either. (Apple Computer
Inc. (2002), QuickTime
for the Web, pg. 252-253.)
- Gamma controls how the intensity
of the displayed images increases with higher values. A gamma
curve describes how graphics hardware interprets luminance values
to display brightness. Gamma issues occur when you're trading
image files among platforms with different gammas. Looking at
the same image on Mac and PC side by side, RGB=0 and Y=0 look
equally black, RGB=255 and Y=255 look equally white, but at Y=127
the PC looks darker. The difference is the gamma. On most PC's,
gamma is that of the CRT, and can be between 2.0 and 2.5 on different
machines (with 2.2 or 2.5 considered the default in different
circumstances). On Macs, the default is 1.8, although the Mac
OS ColorSync control lets you change this. Mac gamma gives you
a lot more detail in the whites at the expense of the blacks.
This is better for print projects, but less ideal for video.
(Ben Waggoner. (2002), Compression
for Great Digital Video, pg. 38-39.)
Now that the easy reading is out
of the way we'd like to provide several solutions to help you
resolve the 'PC Gamma Issue'. However, for these solutions to
work several assumptions have to be made.
- You have selected the best shots
available to tell your story
- You are previewing on a NTSC color
calibrated monitor
- You are only interested in correcting
a version of your final cut for PC viewing and NOT your final
cut for broadcast.
Gamma Correction Techniques
using Cleaner

- Import the FCP sequence into Cleaner.
- Select the Advanced Settings for QuickTime.
- In the Adjust Tab
a.
Select the Gamma button to increase gamma correction. (start
around 30)
b. Select the Brightness button to increase overall brightness.
(start somewhere between 10-20)
- Complete the rest of your compression
and test on your target PC.
Gamma Correction Techniques
using FCP Gamma filter

- Nest the sequence.
- Add a Gamma filter from the Image control
group and set the gamma to 0.8. It is easiest to do this by entering
the number directly into the numeric filed.
- Add a Brightness and Contrast filter
from the same Image Control group and set Brightness to 5 and
Contrast to 10. These are useful starting points, but they will
be close.
- Complete the rest of your compression
and test on your target PC.
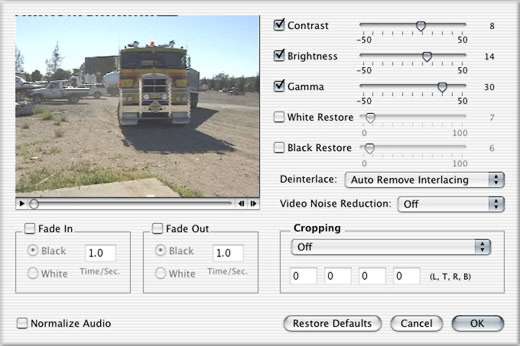
Gamma Correction Techniques
using Sorenson Squeeze

- Import your source file into Squeeze.
- Click on the Filter button to open the
filters dialog.
- Click the checkmarks on for Contrast,
Brightness and Gamma.
a.
Drag the Gamma slider to increase gamma correction to around
30.
b. Drag the Brightness slider to increase overall brightness
by around 10-20 depending on taste.
c. Drag the Contrast slider to around 5-10.
- Complete the rest of your compression
and test on your target PC.
As you can see you have a number of choices
for correcting your Gamma and making sure that your Final Cut
Pro productions look good on your clients PC's. However, it is
important to remember that Gamma correction is only one item
in the long list of pre-processing steps when you are compressing
productions for PC playback.
copyright © James Diefenderfer
2003
copyright © Philip Hodgetts 2003
This article first appeared on www.kenstone.net and is reprinted here
with permission.
All screen captures and
textual references are the property and trademark of their creators/owners/publishers.
|