Its no lie, you can produce full 3.2 + sub channel Dolby Digital
productions using nothing more then a G5 and a few key pieces
of software.
After spending some time reading
over Encoding
AC3 Audio with A.Pack - by Jeff Warmouth, I started
exploring A.Pack. What an incredible piece of software. First
off it can take a 61MB AIFF file and turn it into a 8MB AC3 file,
so the power to save is outstanding. It also allows you to create
6-channel audio. That's what this article is all about. Creating
splendid surround sound audio for your DVD projects.
I've been enjoying surround sound
audio with my home theater system since 2000, I now refuse watch
a movie any other way. Nothing is better then sitting dead centre
with the volume cranked and enjoying the full experience of a
movie. Pending no one else is in the house.
On with the article!
The goal I set out for myself was to take my plain old stereo
intro video and make it sparkle.
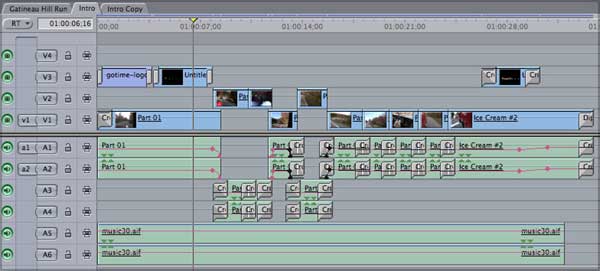
Like any video intro I do, I set
out to build the video sequence, once that is complete and I
am happy with all my edits, I start mixing the audio. This particular
piece is a driving video so I want to hear the engine, the exhaust
and other car sounds. Once all my leveling is completed I launch
into Soundtrack.
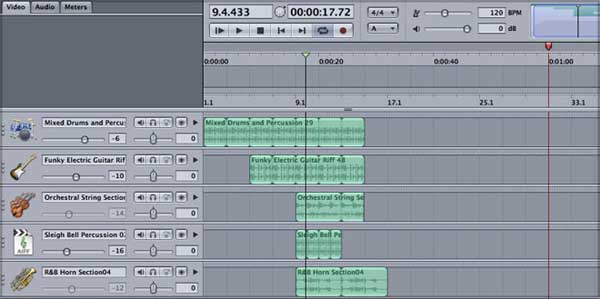
In Soundtrack I select 5 distinct
sounds drums, guitar, horns, bells and strings. Nothing I'd win
an award for, but it does the job. After fiddling with the music
for a while I merge the two pieces of audio together in FCP.
Make what ever tweaks are required to ensure clean balanced audio.
From there I export the stereo
intro audio and video through compressor. I need a complete mix
for the stereo audio stream on the DVD. Once compressor is finished
I return to FCP. I require an AIFF track of just the car sound
at full volume. This will be used on the centre channel when
I start composing in A.Pack.
Sweet sounds in Soundtrack.
Working from the copy of the stereo intro I begin rearranging
the audio sequence in Soundtrack to produce AC3 Dolby Digital
3/2 + sub 6-channel audio. This can be a little interesting,
but you are left with a lot of creative control of where and
when to place your audio elements.
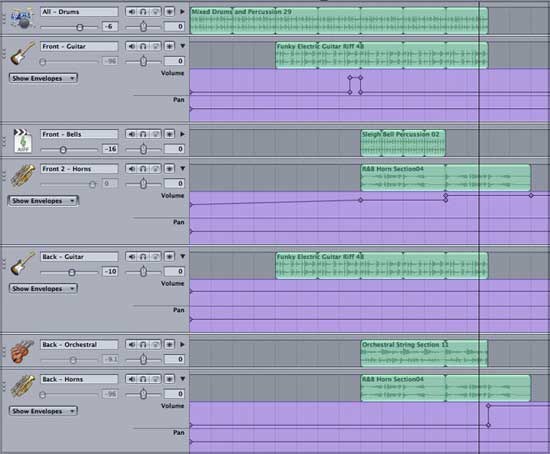
The idea here is I will have music
on the front and back speakers, the car audio in the centre and
the drums on the sub.
As you can see I have already divided
the audio into groups. Drums going all channels except the centre
channel, the guitar is mainly on the rear channels, but does
pop into the front a few times, same idea for the horns mainly
up front, but they do make appearances in the rear at times.
The strings are in the rear and the bells up front. It just makes
the work easier and ensures a balanced audio playback along with
a nice sound experience.
One nice feature about working
with more channels is you gain more freedom to push your sounds
out. You are no longer cramming all these sounds onto small 2
channels of audio you have now have 6 separate channels to flood.
Oh the joy.
After balancing everything, checking
the levels and listening to the groups with speakers and headphones
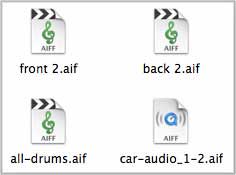
I export the mixes as AIFF files. Drum solo file for the sub
woofer channel, front 2 audio channels with drums, guitar, horns,
springs and bells. Similar idea for the back 2 channels but altered
to fill the holes.
While writing this article I discovered
that A.Pack would not take audio files that are under 48Khz.
There is a preference in Soundtrack to adjust this. Thanks Ken.
A.Pack of hungry audio files.
Once inside A.Pack you can see this application is to the point.
Since I want full AC3 Digital Dolby 3/2 + Sub I select the 3/2
option and enable low frequency effects. The target system is
DVD Video. I leave the Data Rate at 448 and change the dialog
normalization to -31. If you read Jeff Warmouth's AC3 piece you
will see -31 tells A.Pack not to modify the sound levels.
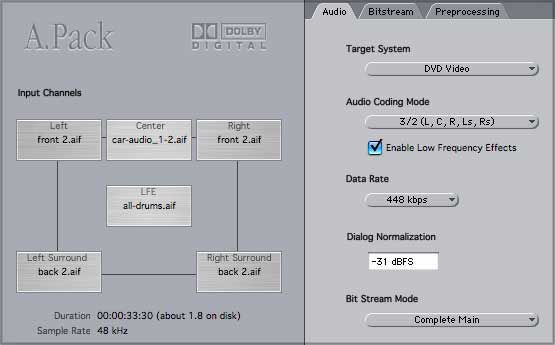
There are no changes under the
Bitstream menu, but under Preprocessing you need to change the
compression preset to none.
Next I place the front 2 sound
files on the left and right channels, car audio on the centre
channel, drums to the LFE (sub woofer) and the back2 files on
the rear left and right channels.
The one draw back to A.Pack is
the fact you cannot test your AC3 files. Yes you can play the
audio through an optical cable to your Dolby Digital sound system,
but it will not engage the system like a DVD will. It only plays
stereo. So until a DVD is mastered there is no way to tell how
the Dolby Digital AC3 3.2 audio sounds, but it wont take long
to build a test run DVD image. A.Pack makes short work of creating
the AC3 file. It took less then 10 seconds and the file was only
1.8 MB. The Soundtrack stereo AIFF file was 10MB.
Power To Burn!
I regroup all my files and head into DVD Studio Pro 2. In DSP2
I place the intro video mpg2 file on the video track, the Dolby
Digital audio file on audio stream 1 and the stereo mix on audio
stream 2.
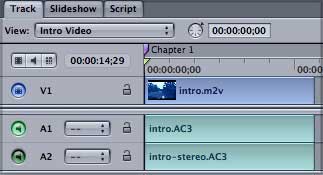
Next I build and format the DVD.
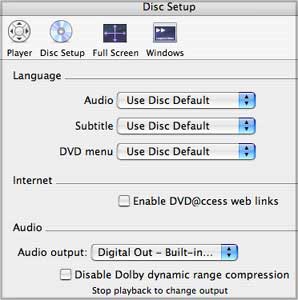
I create an image of the DVD and launch into my DVD Player application.
I have set the DVD Player app to
use the optical output of the G5. This runs to the stereo system
and for the first time I can sit and hear my creation. Drums
all around exhaust notes from the centre, horns up front and
guitars behind me. Wicked!
Summary. Thank you he's done
talking.
So as you can see with current hardware and software anyone can
add Dolby Digital audio to their work. It's an enhancement and
a space saver. What else can you ask for?
Side note, I decided to try the
Dolby Digital 3.2 audio on all my driving videos. The addition
of the back channels and specially the sub woofer really adds
to the viewing experience.
About André
Rousseau
André Rousseau has been in the digital video industry
since 1995 and has over 11 years of editing experience behind
him. He has worked the News beat, cut professional television
series, taught television broadcasting at the high school level
and currently owns his own company GO Time Media from which he
produces DVDs and offers freelance services. Visit his site for
more detail www.gotimemedia.com
copyright © André
Rousseau 2004
This article first appeared on www.kenstone.net and is reprinted here
with permission.
All screen captures and
textual references are the property and trademark of their creators/owners/publishers.