|
   
| Tutorial: Using the Contour ShuttlePro |
May, 2003
Using the Contour ShuttlePro
By Dave
Hardy
On a number of FCP sites
I have found users who are having difficulty understanding how
to set up their Contour
ShuttlePro in a manner that will give them value for the
money spent. To assist any FCP user who may be having a less
than stellar experience with their jog Shuttle, I have put together
a short tutorial on how I use this unit.
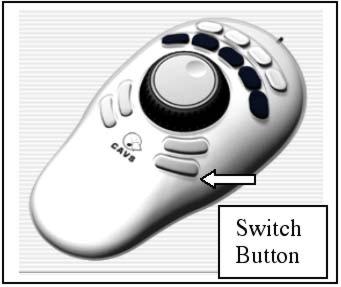
Assuming that you are working in OSX, the one thing you must
really bear in mind when using the Shuttle is not to program
the button in the lower right hand corner below the jog wheel.
This button has a very special function in OSX that it didn't
have in OS 9. This button is known as the Switch button
and it allows you instantly switch between the various sets of
the 12 other button commands. Therefore you should regard the
device as a 12 button command pod with a 13th button that allows
you to switch to the next set of 12 commands. You can add as
many sets of 12 button sets as you wish.
If you wanted to, you could set virtually
every keyboard shortcut known to FCP into the device. You could
do this as well in OS 9, but it wasn't worth doing because the
manner of switching from one set to the next was cumbersome.
Everyone that I know of stuck with a single set of button commands.
The Switch button in the OSX version
changed all that. It made the Shuttle infinitely more useful.
As I already had the entire keyboard shortcuts committed to memory,
I didn't spend a great deal of time setting up the sets of commands.
I simply added or modified a command set when it occured to me
that I could add something that would speed the editing process
beyond what could be achieved by the keyboard shortcuts on their
own.
When you press the Switch Button a line of text appears in the
upper left corner of the Final Cut interface, i.e. above the
Viewer. This button is a toggle that each time you press will
cycle through each of the sets of commands you have added.
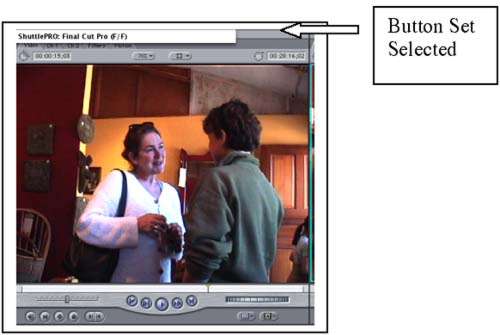
Contour supplies 3 sets of commands (Digitize,
FF, and JKL N/T) with the same 12 commands set to the same 12
buttons in each set. Obviously they never intended anyone to
use these particular sets of commands as these are easily done
from the keyboard (IN and OUT, Previous and Next Edit, etc).
They are just there to provide an example of how to go about
assigning functions to the buttons.
Below are my current sets for FCP 3.
They work to save me time on the productions I am working on.
Your mileage may differ. Set whatever commands will help you
get more work done in a given time period. The 4th set, the Color
Corrector Set, I added. I'm sure I will be adding extra sets
when it occurs to me that I can edit more efficiently by doing
so.
Final Cut Pro (Digitize)
Log and Capture, Set In Point, Set Out
Point, Log Clip
Capture Now, Reverse, Stop, Forward Play, Batch Capture
New Bin Close Window
Bin View, Switch (allows you to go to the Next Set)
Final Cut Pro (FF)
Make In and Out A Selection, Cut to Clipboard,
Paste Insert, Undo
Mark Trim, Go to In, Play In to Out, Go to Out, Browser
Ripple Delete, Make Cut (control V)
Deselect All Switch (go to next set)
Final Cut Pro (JKL N/T)
Select Edit Point, Trim Back Multi, Trim
Forward Multi, Ripple/Roll Toggle
Previous Edit, Reverse, Play In to Out, Forward Play, Next Edit
Trim Back One, Trim Forward One
Slip, Switch (takes us to next set)
Final Cut Pro (CC) this is a set I
added for Color Correction
2 Shots Back, Range Check, Dual Monitor,
3 Up Monitor, Next Edit
Render Selection, RT Mode
Render All, Switch (takes us back to the 1st set)
Setting Up Your Command Sets
After you have installed the drivers
for the ShuttlePro, drag the Shuttle icon to the Dock. Then Control
F3 will open the Dock. With the down arrow key you can quickly
descend through the icons to the Shuttle Icon. Press the enter
key to open the Shuttle interface.
In the interface above, under Target
Application, you can see it is set to Global Settings. This is
a generic set that will work more or less effectively in most
applications. If you want a set that works in Photoshop or Internet
Explorer or in this case FCP, you must choose your application
in the Target Application drop down menu. Once you have selected
one of the FCP sets that you wish to modify, you proceed as follows.
Press one of the buttons on the Shuttle.
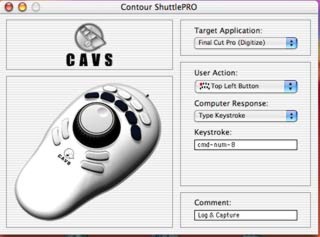
In this example, I have chosen the 1st
set, the Digitize Set, which now appears under Target Application.
I have pressed the Top Left Button on the Shuttle. Notice under
User Action the box now says Top Left Button. The default command
in the User Action is Switch. This is the User Action for the
13th button, the one you must not change if you want to be able
to switch between the various sets of key commands. Its not fatal
if you have already changed it. You can reset this key to Switch
by going into the drop down User Action menu and choosing Switch.
The computer response I have chosen is Type Keystroke. In the
Keystroke box below I have entered the shortcut for opening the
log and capture window.
This is not Contour's default command,
which is Delete In. As it is hardly ever necessary to delete
an in or out point (the far left and right buttons on the top
row), I reassigned these to other functions. The Keystroke command
is entered in the box by selecting the box and pressing the keyboard
shortcut on your keyboard. The command is then automatically
added to the box.
Finally you add the name of the editing
function in the Comment box at the bottom. When you click on
this box the Edit Action Comment Box opens and you type in the
name.

It will probably take some time before
all these sets of 12 buttons are embedded in your memory. I suggest
that every editing session before your client arrives, you open
the interface and quickly press each of the buttons in turn to
refresh your memory. As you press each button you will see in
the Comment box the command you have assigned to that button.
How I Make Use Of The Shuttle
I don't make much use of the Jog/Shuttle
on the unit. The JKL keys on the keyboard handle that function
quite well for me. I use the Jog wheel to move 1 frame forward
or back when trimming. The button above the Switch button, on
lower right side below the Jog I use for making a cut (Control
V).
With the Shuttle placed on the left of
the keyboard, and my index finger on the jog wheel, my thumb
rests naturally on that button. I make the cut with my thumb,
jog I frame left or right with the index finger to the side of
the cut, which is the trim. While doing this, the index finger
on my right hand is maneuvering to the X key on the keyboard
to mark the trim. I moved the ripple delete button to the lower
left button immediately under the jog. With my index finger on
my left hand still positioned on the jog wheel the 4th finger
rests on this button. This combination enables me to do a cut
and trim in about a second.
As I am quite proficient with all the
Keyboard shortcuts for FCP, the challenge for me was to find
ways to speed up the process of editing even more using the Contour
device. Because the Q key on the keyboard is only a 2-position
toggle (Viewer/Canvas) rather than a 3-position toggle like the
U key (Roll/Ripple Incoming/Ripple Outgoing). I decided to assign
the upper left button on the 5-button row above the jog to the
function of selecting the Browser.
If I had not done that, it would have
been necessary to have both hands on the keyboard to do Command
4 to select the Browser. Even worse still I could lose even more
time by using my trackball to navigate to the Browser and click.
To use the mouse or trackball of course is fine if you are working
on your own productions where you can spend as much time as you
like. When editing for clients being fast can sometimes be as
important as being a good editor.
I had the idea of assigning shortcuts
to the various steps on the Shuttle wheel. I abandoned that idea
as without click stops on the Shuttle it would be difficult to
tell which range of the Shuttle I was in and I could easily and
accidentally trigger the wrong keyboard shortcut with the shuttle
wheel.
I use the Shuttle on the left, as I am
using a Logitech
cordless trackball on the right and the trackball is at the
right thumb position. I can hardly wait for my FCP4
upgrade to arrive which will allow me to use the scroll button
to do vertical scrolls in the timeline. This will save me from
having to do Shift Page Up & Page Down.
I'm more or less ambidextrous, so I use
whichever hand lies closer to any object. Maybe that's the case
for most people, I don't know. The Lightworks
Mark and Park command sounds like it may be similar to a nice
feature in FCP4, the Dynamic Cut that is automatically applied
when you press the K key. (providing you have selected this function)
I'm not a Beta tester for FCP so I'll have to wait until the
upgrade arrives to see how this is implemented.
The multiframe trim (Shift + right or
left square brackets) allows you to trim several frames at a
time with a single key press. The default is 5 frames. You can
change that by going to the preferences (Option Q) and changing
the third item down Multiframe Trim to a higher number. Even
though you may enter 15 in this setting, (as of FCP 3) 9 frames
is the highest that will be recognized. Another nice addition
to FCP 4 is that this option can now be set as high as 99 frames.
I probably won't be using this new setting as I find it easier
to simply enter 115 on the keypad if, for example, if I wanted
to do a second and a half trim.
I want to spend the bulk of my time when
editing on structural decisions. I want the technical process
to be more or less subliminal (instantaneous). Whenever I find
that the technology is slowing me down, I look for a way of streamlining
the process. I therefore use all the keyboard shortcuts. The
1st thing I did with the Shuttle was to add commands that required
the use of modifier keys to single button presses on the Shuttle.
This cut down on hand movement on the keyboard.
For example I have a client who finds
it easier to visualize what I am doing if sequences are edited
completely on the timeline rather than by using a Viewer to Timeline
method for doing an assembly. He then decides that he wants to
place a series of shots in a totally different position in the
timeline. Fine. I can accommodate to that approach. I added the
Cut to Clipboard and Paste Insert to the Shuttle buttons to allow
me to do this in a second or two.
One of the attractions of the craft for
editors is that no matter how many times you review and work
on a cut you can almost always find a fresh approach. The same
phenomenon applies to the technology. We all find there are times
when we will chose an alternate method of doing a trim because
at that moment it instinctively just feels right to do so. The
Contour ShuttlePro fits right in there. Often it will save you
time and sometimes it will just satisfy an instinctual impulse.
copyright©2003Dave
Hardy
All screen captures
and textual references are the property and trademark of their
creators/owners/publishers.
Dave
Hardy is a member of the Vancouver
Final Cut Pro user group. In 1987 he set up the full time
day program for the Vancouver Film
School He was head of instruction for the program from 1987-1990
and taught courses in Film Editing and Cinematography. Today
Dave is a freelance Final Cut Pro editor in Vancouver. For the
past 3 years he has been teaching private workshops to editors
and assistants who wish to get up to speed quickly with FCP.
|