|
   
| Tutorial: - Perspective
Filters in FCP |
 November, 2001 November, 2001
Perspective
Filters in FCP
By Ken
Stone
In FCPs' Effect
Browser is the 'Perspective' Effects bin which contains five
different filters. Three of these are special effects; Basic
3D, Curl and Mirror. The remaining two filters,
Flop and Rotate are used for changing the orientation
of video.

Basic 3D
This filter is called 'Basic 3D' but
you won't need special glasses to use it. Rather than making
the image in the video pop out at you 3D style this filter manipulates
the plane of the video to give a 3D look. Place the Basic 3D
filter on your clip in the TL and double click to load it into
the Viewer. In the 3D control panel there are three different
settings for axis rotation all of which are Keyframeable. There
is a 'Center' button for locating the center or pivot point for
your image rotation. There is also a Keyframeable 'Scale' setting
for changing the size of your video over time as it displays
the effects of the 3D filter.

Shown below left, the X axis rotation
setting gives the look that the top or bottom of your video is
falling away. The Y axis rotation is like a door being opened
where the edge of the video is swung away from you. The Z axis
rotation tilts the video image through 360 degrees.

X axis
Rotation |
|

Y axis
Rotation |
|

Z axis
Rotation |
Curl
The Curl filter is not to be confused
with the 'Page Peel' Transition which works at the edit point
between two clips on the TL. The Curl filter is applied to an
entire clip. The first control is 'Direction' which determines
the starting point of the curl. The 'Radius' control sets how
tight the curl will be. 'Amount' determines how far into the
image the curl will progress.

As you can see in the images below the
backside of the Curl is mapped with the same image as on the
front.

No Curl
applied |
|

Start of
Curl effect |
|

Additional
Curl effect |
In the control panel there is a 'Peel'
box (Blue arrow). Checking this box will keep the Curl from wrapping
around itself and will simply peel the image up and away, see
below left. The last control, 'Back', has an Image Well. You
can drop video or a still image into the Well, shown below center.
The image that is in the Well will be mapped to the back of the
Curl so as the Curl progresses more of the image on the backside
will be revealed. With all the examples that I have shown so
far there is only one clip on the TL so as the image Curls a
Black background is exposed. This Black background is really
an Alpha Channel, it's transparent. In my last example below
right I have placed a landscape beneath the video with the Curl
filter. Now as the Curl rolls up the new landscape that is below
on the TL is shown.

Peel
effect |
|

Peel
effect with Image on back |
|

Peel
with video on track below |
The Curl filter is really not a static
filter. You will want to Keyframe several of the control settings
to achieve a good effect.
Flop
The Flop filter does just that, it will
flop or flip your image either Horizontally, Vertically or both
at the same time. There will be occasions that you want to flop
your video. Just be careful that there is no writing in the video
as it too will be flopped and will read backwards.


Rotate
The Rotate filter will rotate your image
to the four points on the compass. If you will look at the example
below left you will see that when you Rotate your image to either
of the two 90 degree positions that a fair amount of distortion
can be seen.


Mirror
While you might not often have the need
for this filter when you do you'll find that it works well with
good controls. On default the Mirror filter will split your image
creating the mirror seam in the center of your video. In the
Mirror controls is the 'Reflection Center' button. Click on this
button and then in the Canvas window and you can set the position
of the mirror in your image. The 'Reflection Angle' control allows
you to sweep the reflected image through 360 degrees to help
achieve the look you want. Both of these controls are Keyframable.

I worked with this filter and while I
liked the effect I felt that something was lacking. I wanted
the effect to fade in, as it were, but this filter is not a transition.
It effects the entire clip.
In order to enhance the look of the Mirror
effect I first placed my clip on V1, dragged the Mirror filter
from the Effects Browser and dropped it on my clip. Double clicking
on the clip in the TL loaded the clip into the Viewer. In the
Filters tab I set my Reflection angle. I then placed the same
clip, without the filter, on V2 directly above the first clip.
As you can see from my TL below I faded out the unfiltered clip
on V2 at the same time I faded in the clip on V1 which has the
Mirror filter applied.

This gave me the look that I was after.
Shown below, the image on the left, with the Playhead at the
start of the clip, is the video clip on V2 with no effect showing.
The middle image shows my two clips with the top clip fading
out while the Mirror clip starts to fade in revealing the reflected
image at the bottom of the video frame. The image on the right
shows the full Mirrored clip after the fades have been completed.

Video
on V2 |
|

Midway
through Fade |
|

Final
effect |
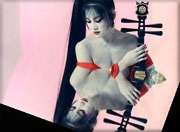
The image below employed the Mirror filter with the edges peeling
up over time. A second composited image on V2 used a combination
of filters. Mask Shape, Feather Mask, Size, Rotation and Position.
The small upside down image at the bottom fades in only after
the normal video has been faded to the Mirrored version. The
point I am trying to make is that while using one of these filters
like Curl or Mirror will add a nice little effect, FCP and your
creativeness are capable of so much more. Adding a filter can
be just the starting point. Adding additional filters, Keyframing,
motion and opacity control will give you the opportunity to be
truly creative and take advantage of FCP awesome compositing
capabilities.

Enjoy,
--ken
copyright © Ken Stone 2001
This article first appeared on www.kenstone.net and is reprinted here
with permission.
All screen captures and
textual references are the property and trademark of their creators/owners/publishers.
|