Video producers, you should be ecstatic! We are living in a time
in history where prosumer level video exceeds the broadcast quality
video of yesterday. Our footage can remain lossless throughout
post and output. We have powerful 3D tools and effects right
on our computers. We can edit in real time on a pro system for
less than $7,000, and the list goes on.
All this hype is not just about resolution
and format. It seems that as I am writing this paper, the video
world is quickly changing towards a more cinematic future. There
is a lot of excitement over 24p camcorders, which are now available
in the prosumer market. Native 16:9 cameras are more widely available,
and HD, the format that will give video producers the resolution
they need to rival film, is at least a little more mainstream.
And this is where I fit in For
the past two years I have been on a "making video look like
film" quest. About a year and a half ago, after trying just
about every method out there, I realized that if I want my projects
to look like film, I'd have to shoot film. But over the past
several months, my opinion has been changing, at least a bit.
I believe that the science of cinematic video will be exacted
in the near future and will be available to the average video
producer.
So for now, my desire is not so much
for my narrative video projects to look like film, but for them
to look less like video. That we can do, and that is what is
important.
Video has a realistic look. Film has
a storytelling look. Even the general public, who might not appreciate
the differences of film and video, have a harder time engaging
a narrative project shot with video (barring HD). So the challenge
is to effectively tell a story using video. Film has nothing
to do with the equation.
Let's start with
looking at some of the qualities that have made film the medium
of the century:
1) Motion qualities. Natively, film does stuff that only now computers
can be programmed to replicate. Adjusting the motion of your
project may be the single-most important item you can do in achieving
an effective narrative piece on video. Most film is shot at 24
frames per second. In my opinion, there is not a gigantic difference
between 24fps and 30fps.
Although I prefer 24fps, when adjusting NTSC video, usually good
30p results are more achievable. The underlying necessity is
to eliminate the very telling 60 field video look.
2) Aspect ratio.
The typical aspect ratio for motion picture projection is 1.85:1
(35mm). This aspect ratio increases to 2:1 and even wider with
some formats.
A wide aspect ratio is not necessarily a native property of film.
Widescreen is potentially just as natural for video. To the viewer,
this wider aspect ratio has become synonymous with the cinematic
experience. Additionally, an anamorphic area is a more interesting
space to compose in.
3) Contrasts with rich blacks: Native properties of film.
4) Softer edges.
One of the most telltale attributes of video is its harsh edges
and over saturated colors.
5) High Resolution / High Contrast
Ratio. These factors are the
basis of the cinematic look. Before HD, video could not compare
to film in these areas.
Other factors:
Good lighting and attention to set
design. The primary reason that
theatrical film and network television look so good is because
its producers pay close attention to details. I have been on
sets where it takes the effort of dozens of people and much time
to get one shot in the can. For selected shots on the project
described below, I shot anamorphic DV, softened the edges, and
lit the set well. I was so happy with the results right out of
the camera, I debated whether or not to do any post processing
at all. I ended up processing the footage, but the fact remains
that we were 75% of the way there just with pre-production.
With this information and philosophy,
I have embarked on a new project. I also used a fairly new product
called the Magic Bullet Suite. Our production is documented in
this next section.
The project, "Welcome to RCCM" click
here to see the movie in the Quicktime format
The Set:
The trick is not to just light well, but to light like film.
Promoting shadows, contrasts, short depths of field, and washout
whites will all help. We used (on select shots) our Mole-Richardson
1ks and Mickey Moles to burn out the background, and create a
simple hot light configuration. We used a small soft box for
fill. We did not use a hair light (used on typical 3 point systems).
The Camera:
We used the Canon GL1, with Century Optics's 16:9 adaptor. Internally,
we softened the sharpness close to all the way. We used the zebra
pattern to ensure exposure. Although contrasts are great, over
and under exposure will negatively affect the final product.
Audio was captured using Sennheiser's System K6 shotgun mic adapted
to use with the GL1's mic level input with Studio One Productions
XLR adaptor.
Approximately half of the shots in this
project were designed and shot specifically for this project,
the other half were taken from our stock library. Many of the
stock shots were shot in 4:3. We knew we wanted to output 16:9,
so we looked at just about all options to introduce the 4:3 footage
into our 16:9 project. The "blow-up" test never even
got rendered. For a 4:3 shot to fit in a 16:9 frame it must be
substantially blown up. The results are noticeably degraded.
After more thought, we decided to "camouflage" the
4:3 differential by moving the 4:3 footage to the extreme right
or left (usually alternating) of the 16:9 frame. We feathered
the "hard edge" in AE, and added a subtle animation
in the open space.
We were a little concerned that the animation
would distract from the video clip, so we adjusted the opacity
of the animation to the point that the video was dominate in
the frame. In test screenings, most didn't even notice the animations,
and interestingly even fewer noticed that the project was not
entirely 16:9.
Post:
In past projects with FCP, I've captured, cut, and exported.
In this project, I dove much deeper into the hair splitting world
of perfect NLE. I should first make note that if this post process
seems excessive, it probably is. The following is an awful lot
of work just to save a render or two. But, there are other tangible
benefits of doing it this way, and there is always the satisfaction
of knowing you did it right!
The post process:
1)
I started the same way. I captured and edited the entire project
in a single sequence in FCP. Once everything was fairly accurate
(with effects, etc), I looked for ALL the "steel gray"
bars in the timeline (everything that has been rendered), made
notes of the I/O's and effects, and recreated all of them in
AE with the original source footage (the same footage that FCP
was pointing to).
In AE, I created a new project and each effect shot became its
own Comp within this project. These individual comps would eventually
become part of the final output, so I made sure they were good
and would require no further adjustment.
[Note: Because FCP
is far better equipped to allow you to preview your sequences,
I found that it actually saves time if you perfectly create the
entire project in FCP first, then just recreate the effects shots
in AE. This takes the guesswork out of the AE process; you just
match the I/O's from FCP.]
[Note: There is a
product on the market called Automatic Duck (www.automaticduck.com). This product exports FCP timelines,
then imports them into AE while maintaining original FCP timeline
attributes. This product is defintely worth its price tag if
this is to become a regular process for you. I did not use it
for this project, nor have I tested it. Video guru Jerry Hofmann
reviewed and gives this product a positive rating (review can
be found at creativecow.net). For me, Jerry's review is quite
enough proof to bank on the products effectiveness as he has
been an authority in the video world for years. I will certainly
use this product in the future.]
Once all the Comps were complete, I outputted
them from AE using draft quality. I imported them in FCP, and
replaced the FCP-originated effects shots with the new AE comps.
At this point, there were no rendered shots in the FCP timeline
(not including the drafts from AE that would be final rendered
later). Although not in final quality, this was my final project.
But of course, it was not. I noticed some small things that needed
correction, so I had to adjust some of the comps in AE and re-output.
The purpose of this step is to perfectly lay out your project.
It is vital to make all necessary time corrections at this point.
From the standpoint of I/O's and transitions, your project should
be final before proceeding to the next step. Depending on how
many effects shots you have, the final output step in AE can
be very complex. A meaningful preview in AE is almost impossible.
Once I was comfortable with the draft version of the project
in FCP, the real fun began.
2)
First of all, I exported a "video only", self-contained
FCP Movie to use as a reference track (called "WRCCMref").
3)
Next, I mixed down and exported a "audio only" FCP
movie (called "soundtrack"). This audio track would
eventually serve as the final audio track.
4)
At this point, I opened my AE project, and imported these two
FCP Movies into it. I created a new comp and dragged "WRCCMref"
into it. This track starts at "0", so no thought is
required -- just place the "playhead" in the AE timeline
at "0", and drag the clip into the comp window. I left
"soundtrack" alone for the moment.
5) Once
I got that far with AE, I popped back over to FCP. I made a copy
of the FCP project, and deleted all the draft AE comps I imported
from AE from it.
6)
At that point (in FCP), my video was spread out over four layers
in the timeline. I had to reduce it to two layers, maximum. All
effects, slow-motion ,text, transitions will be added in AE.
Once you get rid of these in FCP, your video should fit it one
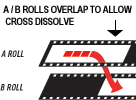
layer in the timeline. I had dissolves planned, so a second layer,
a B-roll, was needed. Remember, I "layed" these dissolves
out in FCP in a previous step, so I knew exactly how much to
overlap the A/B rolls.
At this point, my project co-habitated.
All the "straight shots" -- the ones that didn't or
wouldn't require rendering, lived either on the A Roll (layer
1) or on the B Roll (layer 2) in FCP. All of the effects shots
and text live in unrendered "comp" form in AE.
7) Next, I outputted the A-roll and B-roll
separately as FCP REFERENCE Movies. Making these files "reference"
movies instead of "self-contained" movies saves an
unnecessary recompression. In FCP, a reference movie is a small
file (that AE recognizes) that points to the original source
file. For example, the outputted A-roll reference movie that
will be used in AE for final output is referencing the same clips
I originally captured from tape. No recompression or rendering
has ever degraded the quality.
8)
Although a little time consuming, these next steps were rather
painless. First, I imported the A and B rolls into the same AE
composition I had previously created for "WRCCMref"
(the FCP Movie we will use for sync), and "soundtrack".
I then synced the A and B rolls with WRCCMref. I did this by
simply laying the A roll over WRCCMref and toggling the A-Roll
layer off and on and adjusting until the A roll footage perfectly
overlayed the same footage in WRCCMref. Remember that there are
many "holes" in the A-Roll, but I spot-checked the
footage that was there throughout the duration to make sure it
was synced with the reference track. I then did the same for
the B-roll.
[Note: Do not confuse
"Reference track" or "Sync track", which
is "WRCCMref" to "FCP Reference Movie" which
are the A and B Rolls.]
9)
Next, I starting dragging in the comps that would complete the
project. I toggled the A and B rolls off, and used only "WRCCMref".
According to WRCCMref, my first effect shot came in at the 2
sec point. I placed the playhead exactly at this point, and dragged
in the comp. This placed the comp directly over the same footage
in the reference track. I confirmed this by checking the I/O's.
I continued this until all the comps were in. Each time, I checked
the cuts in the reference track against the newly entered comps
by toggling the new layer on and off and comparing it with the
reference track. All the comps should perfectly overlay the same
footage in the reference track.
10)
At this point, I spot-checked again to ensure alignment. Then,
I deleted the reference track (WRCCMref) from the comp. The A-roll
was complete!
11)
Next, I created the B-roll.
[Note: One again,
the purpose of placing clips on the B-roll is so you can cross
dissolve from A-roll footage to B-roll footage.]
Creating the B-roll took far less time
as it contains just three shots. The first shot on the B-roll
came in at the 12 sec mark. At this point in the film, you can
see the RCCM sign (on the A-roll) dissolve to a blue sky (on
the B-roll) then to a wider shot of the sky and clouds with the
sun peeking out (on the A-roll).

These dissolves are approximately 1 second
each. Therefore, the A/B roll footage must overlap by at least
15 frames on each side. Understanding dissolves in FCP helps
understand them here. Also, notice the quality of these dissolves.
They were created using Magic Bullet Opticals. They are designed
to mimic dissolves produced with optical printers used in film.
I consider these one of the "tangible benefits" of
outputting this way. I truly like these optical effects, I will
discuss them further in the Review section.
First I dragged in the B-roll reference
movie that I exported from FCP. Only one of the three shots that
was to be on the B-roll was on this clip. The other two clips
were in comp form. I temporary dragged in "WRCCMref"
and used it to properly place the comps. Once everything was
properly aligned, I deleted "WRCCMref", and the B-roll
was complete.
12)
With the A-roll and B-roll comps complete, I was ready to begin
using the Magic Bullet Suite. The Magic Bullet Suite contains
five modules. The "flagship" module is called Magic
Bullet. This module deinterlaces and dearticfacts your footage
-- effectively adding a film-like motion quality to your project.
I will go deeper into this and each of the modules in the review
section.
[Note: When the Magic
Bullet deinterlacer is used, the "Separate Fields"
menu in the "Interpret Footage" window must be switched
to "off" for all your source footage. Select each source
file in the Project Window (one at a time), and press "command
+ f" for the Interpret Footage window.]
I created a new comp, called "A-Roll
Magic Bullet". I dragged the "A-roll" COMP into
the "A-Roll Magic Bullet" comp. I did this by placing
the playhead at the "0" point, then dragging the A-Roll
comp onto the "A-Roll Magic Bullet" comp window. I
then applied the effect to the A-Roll comp that was within the
"A-Roll Magic Bullet" comp. Applying MB is painless.
Once applied, you are prompted to perform an "Auto Setup".
The Auto Setup button appears in the effects window once the
Magic Bullet effect is applied.
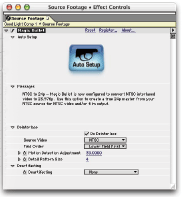
Auto Setup takes just a few moments to establish your comp's
frame rate and set your progressive frame rate. A comp set to
a frame rate of 23.976 will be rendered at 24p. A comp set to
a frame rate of 29.97 will be rendered at 30p. Magic Bullet recommends
a final product of 24p from DV NTSC source footage. To achieve
this, you change the comp's frame rate from 29.97 to 23.976 (select
the comp and press command + k).
On the outset of this project, I thoroughly
tested 24p footage and 30p footage that MB produced. I will discuss
this testing later in the Review section. Because of the type
of project that "Welcome to RCCM" is, I decided to
use 30p. 30p is not a compromise. The simple explanation is that
it removes the immediacy of video without distracting motion
artifacts. "Welcome to RCCM" is supposed to be warm
and inviting. It is not a narrative or a "reality"
project. The goal was to make the viewer feel engaged without
being a "dimension" away, while getting rid of the
immediacy of video. This is not to say that actual film is not
warm and inviting; it is. But video processed to look like film,
doesn't seem to maintain quite the same warmth and graceful motion.
Another component of this Magic Bullet Module is the Deartifactor.
According to MB, the Deartifactor effectively removes video artifacts,
including banding and aliasing. I applied the Deartifactor using
the "DV 4:1:1" preset which targets artifacts native
to the DV codec.
13)
I did the same for the B-roll. Created a comp called "B-roll
Magic Bullet" and applied the effects.
14) The
Magic Bullet deinterlacing / deartifacting steps above took just
a few minutes to complete. Next, I created a new comp called
"A-roll Color Correction / Looks". This step took some
time. Here we would craft the look of the project. With this
project, I certainly didn't push the Magic Bullet look envelope.
As far as "look" goes, I believe Welcome to RCCM reflects
the more subtle side of Magic Bullet, the side that I am most
likely to use on an ongoing basis.
[Note: All of the
effects such as Trapcode's Shine were added in step 1, in the
individual comps, not here.]
I basically used three tools:
1. AE's "Levels"
2. AE's "Color Correction"
3. Magic Bullet's "Look Suite"
In the "A-roll Color Correction
/ Looks" comp, I dragged "A-Roll Magic Bullet".
I added the effects "levels" and "color correction
to the "A-Roll Magic Bullet" layer. I started color
correcting and adjusting the levels of the entire project by
placing "hold" keyframes at the cuts and adjusting
shot by shot. I did this in order from the beginning, because
not all shots would require adjustment. Using "hold"
keyframes made it easier to skip over shots. Be very careful
here! It would be a good time to do a refresher tutorial on keyframing.
You want to make sure your adjustments are isolated on just the
shot (or sequence) you are correcting. Especially if you are
planning on doing some heavy "Look Suiting", you may
want to take some extra time adjusting/correcting here. The Look
Suite likes doing everything itself. If you bring in nicely lit
and exposed footage, Look Suite will do well with it. In your
levels adjustment / color correction step, craft everything so
it is consistent and plain, then let Look Suite handle your saturations
and contrasts.
Once my level and color correction adjustments
were complete, I started the Look Suite process. The first shot
I wanted to process was the first shot in the project. It came
in at the 2-second and 15 frame point. I placed the playhead
right at this point and added an Adjustment Layer (New > Layer
> Adjustment Layer. I then shortened the adjustment layer
so it covered just the duration of that particular shot.
[Note: It is important
to have the adjustment layer cover just the footage you are targeting.
You can ensure this by toggling on and off the "Adjustment
Layer" switch (located in the "switches panel").
The footage covered by the Adjustment Layer will turn white when
the switch is toggled off.]
An Adjustment Layer is a nifty feature
of AE that acts as a transparent layer where you can apply effects,
or adjustments. In the Layer menu, I renamed the adjustment layer.
By the time I was finished there were many Adjustment Layers.
Naming them is a great way of keeping organized. With the adjustment
layer selected, I selected Effect > Magic Bullet Suite >
Look Suite to add the Look Suite.
The Look Suite is powerful tool and is
easy to use and craft. It has four major components: Subject,
Lens Filters, Camera, and Post. It also has a list of presets
including traditional looks and more modern processes. For the
first shot, I simply increased the contrast, saturation, and
gamma. For most of the other shots, I started with a preset,
and tweaked the values to achieve the exact look that was appropriate
for the particular shot. Custom presets can also be saved and
reapplied just as any other preset.
I had every intension of making the presets
I saved available for download. As it turned out, I did not rely
on a single preset. In just about every LS shot, I tweaked the
values. I recommend taking some time and customizing a look that
works for you. The controls are straight forward, and easy to
tweak and preview. Unlike the deinterlacer, you do not have to
do render tests; you can simple preview the look right in the
comp window (obviously, it will look slightly different in a
NTSC monitor). If a single shot does catch your eye, I can make
that preset available. I continued the process of adding Adjustment
Layers, and applying Look Suite until "A-roll Color Correction
/ Looks" comp was complete.
15)
I then created a new comp called "B-roll Color Correction
/ Looks". Again, I adjusted levels and color corrected,
and then added adjustment layers and Look Suite effects.
16)
With the Look Suite applied to the footage, the only remaining
step was to apply the transitions and audio. To begin the transition
step, I created a new comp called "Welcome to RCCM".
This would be the first comp to contain the final product. I
dragged in "A-roll Color Correction / Looks" comp,
and "B-roll Color Correction / Looks" comp. I then
created a new Solid Layer (Layer > New > Solid) and placed
it on top. I renamed this layer to "Opticals". I then
added the "opticals" effect to this solid layer (Effect
> Magic Bullet Suite > Opticals). In the "Opticals"
effect controls, (in the timeline) I specified the "A"
source ("A-roll Color Correction / Looks" and the "B"
source ("B-roll Color Correction / Looks"). At this
point, the A/B layers can be switched off. Only the "opticals"
layer in this comp needs to be enabled. I could now perform cross
dissolves by simply keyframing the "Dissolve A-B Slider".
When this slider is at 0% you will see only the A source, when
at 100% you will see only the B source. I used this slider for
the two dissolves in this project. The first dissolve started
at the 12 second point in the film and lasted 4 seconds. I placed
a keyframe in the Dissolve A-B Slider at the "in" point
with a value of 0, and another 4 seconds later at the "out"
point with a value of 100. This caused the "A" layer
to dissolve into the "B" layer. I then dissolved back
to the "A" layer at the end of this shot. Commonly
there will be dissolves at just one end of a shot. In this case,
you dissolve "in" as described, then after the last
frame of the "B" roll shot, simply place a "0"
value keyframe to take you directly back to the "A"
roll.
Finally, at the beginning of the project
there is a simple fade in, and at the end, a burn to white. There
is a separate keyframable control of these effects called "fade/burn".
At frame 1 of the project I placed a "fade/burn" keyframe
with the value of -100, and another at the 4-second mark with
a value of "0". This gave me a beautiful optical fade
in. The "burn" at the end lasted just over 1 second.
I placed a fade/burn keyframe with a value of "0" where
I wanted the burn to begin, and another just over a second later
with a value of "100". There are a couple of more things
about opticals you should know that are desribed in the Review
section. To complete this step, I dragged in "soundtrack",
and made sure the layer started at the first frame for perfect
sync.
17)
The final step is output. Potentially, you can get really fancy
here. If you went down the 24p path, you can actually output
what is virtually a Digital Answer Print (DAP). A post house
can use this very file to make a film print. If film is a possibility,
go 24p. I outputted two different ways: straight 16:9 and letterboxed.
I will eventually use the 16:9 output for upcoming DVD projects,
for use on our widescreen projectors, and for making compressed
web files. Setting up for this output was simple. I made a new
comp called "Final 16:9 output", and dragged in "Welcome
to RCCM" (the comp that holds the final project). I then
added an Adjustment Layer where I would introduce another component
of the Magic Bullet Suite called "Broadcast Spec".
Broadcast Spec is a great feature of MB that scans the footage
and ensures that all colors are legal to the NTSC Standard. Threshold
levels can be adjusted, but I kept them at default values, and
used the "Component" preset. (More on Broadcast Spec
in the review section.)
I then added "Final 16:9 Output"
to the Render Queue. I was working with the comp window at 50%
size and half resolution. So in the Render Queue's "Render
Settings" I changed the "quality" to "best",
and the "resolution" to "full". In "Render
Settings", I kept everything else at default values. [Note:
If your project is 30p, ensure that "Field Render"
is set to "off", if your project is 24p, you will need
to use AE's 3:2 pulldown. For DV, select "Lower" in
"Field Render" and in "3:2 pulldown" select
the last setting "WWSSW".] I hit "OK" in
Render Settings" and then clicked "Output Module".
In "Format Options" I changed the CoDec from "Animation"
to "DV-NTSC", at best quality (100).
Finally, in the "Output Module" I enabled "Audio
Output", and changed the default settings to 48k 16 bit
stereo.
[Note: Although "Animation"
is a lossless CoDec, DV-NTSC is the way to go if your footage
originated in that format. Remaining in the original color space
will ultimately give you the best possible quality].
[Note: When AE imports
video footage, it also imports audio if it exists on the file.
To ensure that your output only contains audio from your soundtrack,
disable the audio switch next to all comps other than your soundtrack.]
I then hit OK to accept the changes to
the "Output Module", and then I clicked "Render".
For the letterboxed output, I created
a new 4:3 comp (DV-NTSC 720x480) and added a solid layer (New
> Layer > Solid) to it. I changed the color to black. I
then dragged in the "Welcome to RCCM" comp. The comp
did not fit correctly, but I used the comp's marker to align
it to center. I then used a neat feature of AE to properly scale
the widescreen comp within the 4:3 comp. I did this by hitting
"command+option+shift+h". I then added Broadcast Spec
and adjusted Render Queue settings as described above.
Click HERE to read the Magic Bullet Suite
Review
copyright©Steven Galvano
2003
Steven Galvano
Colors Studios www.colorseverywhere.com

Recommended Resources:
FCP
Discussions on Apple.com
creativecow.net
Magic Bullet User Manual
Equipment Used:
Apple Final Cut
Pro running on a Dual G4 Machine. Although I may have neglected
FCP in bit during this project, I could not recommend it more.
Canon GL-1 Mini DVcamcorder.
Sony
DSR-11 DVCam VTR
Adobe
After Effects 5.5
Cleaner
5
Trapcode's
Shine
Magic
Bullet Suite
Century's
16:9 Anamorphic Lens for the GL1
This article first
appeared on stevengalvano.com and is reprinted here
with permission.
All screen captures and
textual references are the property and trademark of their creators/owners/publishers.