|
   
| Tutorial: - Using the Channel Filters in FCP |
October, 2001
Using
the Channel Filters in FCP
By Ken
Stone
In the FCP Effects Browser in Video Filters
you'll find a bin called 'Channel' with six filters. These filters
work by manipulating the color and Alpha channels of your video.
You can alter all three channels at once, or you can select R,
G, B or Alpha and alter a single channel.
All six Channel filters are used
for creating special effects with video. Each filter has it's
own different set of controls which Apple calls 'operators' which
can be found in a drop down menu in the controls of each filter.
While these controls might be called 'operators' many behave
like composite filters and many have the same name.
There are many thousands of variations
within any one filter. We'll look at each filter, go over the
controls and I'll show some examples of what these filters can
do. Please remember that my examples started as screen shots
from my Canvas window and have been Jpegged for the web. They
are much more exciting on NTSC.

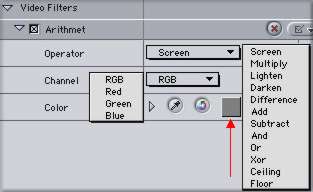
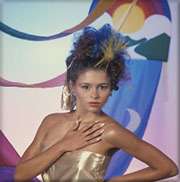
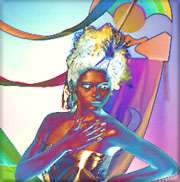
Arithmetic
The Arithmetic filter works by compositing
the video image with the color that is selected in the filter's
'Color' control, Red arrow below. Shown here with the default
Gray you can change the color by using the eyedropper, entering
numeric values, or clicking on the color swatch which will produce
a color wheel to select from. There is a drop down menu that
offers the choice of compositing the selected color with RGB,
or any one of the three channels individualy. Once these two
parameters have been set you can use the 'Operator' drop down
menu to select which compositing mode you want.
Each of the 12 different 'Operators'
will produce very different results, most of which will be reasonably
unattractive, some can be very exciting. There are 12 'operators'
with four different channel choices and millions of colors to
composite with. The options are endless.
No Effect |

Midtone Gray - Floor 'operator' |
Midtone Gray - Different
'operator' |

Midtone Gray - Xor 'operator' |
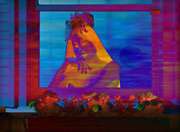
Channel Blur
The Channel Blur filter opens up with
a default setting of 2 for all four channels. This filter is
a bit limited as it attempts to do the same thing as the Gaussian
Blur filter but is lacking some of the controls of the Gaussian
filter. Most importantly the 'Luminance' control.

No effect |
Channel Blur - Red channel |
Channel Offset
This filter allows you to offset (shift)
your image horizontally or vertically or both within the space
of your video frame. You can move the complete image or one color
channel leaving the other color channels in place. The first
control to be set is 'Channel'. This filter defaults to Alpha+RGB
which represents the entire image. Clicking on the drop down
allows you to pick one color channel to be offset.
The next control 'Center Offset' is how
you actually move or offset your image or channel. Click on the
'+' button, Red arrow below, then click in the Canvas window
to set a new center point. Each time you want to reposition your
image you'll need to click on the '+' button. You can enter numeric
values for your position as well.
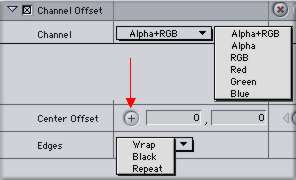
After you have offset your image or one
color channel of your image there will be a gap where the image
was moved from. The 'Edges' control offers three different ways
to fill that gap. 'Wrap' will take the image that is moved outside
the video frame when you offset and place it on the other side
of the image that now has a gap. If you will look at the 'Wrap'
example below you will see that the left hand side of the image
that is cut off due to the offset now appears on the right hand
side of the image where a gap would be. As this offsetting can
be Keyframed this filter can offer some interesting motion effects.
The next option is 'Black' which fills
in the gap with the color black. This is not unlike the FCP Crop
tool. The third option is 'Repeat' which takes the last row of
pixels from the edge of the image and repeats the pixels over
and over to fill the gap. In the 'Repeat' example below you can
see that the gap on the right hand side is now filled with pixels.
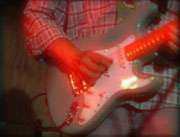
The fourth example below 'Red channel
- Wrap' shows the video with only the Red channel offset.

No Effect |
Alpha+RGB - Wrap |
Alpha+RGB - Repeat |
Red channel - Wrap |
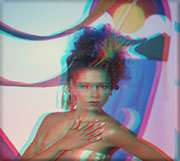
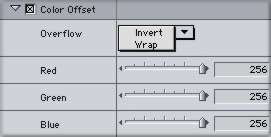
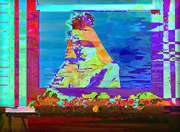
Color Offset
This filter is a bit like a 'psychedelic'
or 'posterizing' filter from days past. It opens with 'Invert'
selected in the Overflow control. All color sliders are set to
256 and the video image is inverted on default. As you move the
RGB sliders to the left to 0, less and less effect is applied.
At zero settings the video is normal.
The second option in the Overflow control
is Wrap. When Wrap is selected the sliders work in a different
fashion than with 'Invert'. Both a 0 and 256 setting for each
of the color channels will produce normal video and a midway
setting will produce the most effect. Wrap works by allowing
you to change the Hue of each of the three different color channels,
R, G,and B separately.
Invert |

Invert |

Wrap |
Wrap |
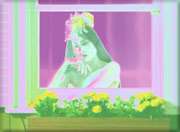
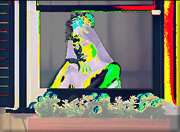
Compound Arithmetic
I like this filter, actually I like any
filter that provides an 'Image Well' (Red arrow below). The Compound
Arithmetic filter is a compositing filter and needs two images.
The video is the first image, the second image will come from
the Image Well. You can drag and drop video, text and photographs
into the Well. When a video clip is dropped into the Well only
the first frame of the clip will be used, changing the Poster
frame or setting an 'in' point will not make a difference. I
have found this to be true of several other filters that have
Wells. I simply make a freeze frame from the video clip of the
frame that I want and drop that into the Well.
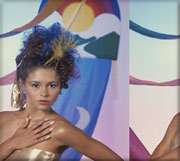
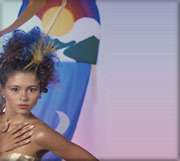
This filter only works with an image
in the Well. There are 11 ways (operators) to vary your composite.
In my examples below I have used a graphic landscape image of
a sunset with clouds for the Image Well.


Alpha+RGB - Multiply 'operator' |
Alpha+RGB - Xor 'operator' |
Alpha+RGB - Difference 'operator' |
Alpha+RGB - Or 'operator' |
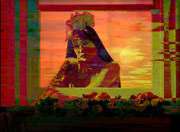
Invert
The Invert filter does just that. It
changes the video image from a positive to a negative image.
We are given the choice to invert RGB, with or without the Alpha
channel, or to invert just one color channel. Aside from this
we have two operators 'Y' and 'UV'. The Invert filter defaults
to Alpha+RGB with the Amount slider at 100. As you move the slider
towards the midway point of 50, less and less inversion is applied.
With the Amount set to 50 there is a type of cancellation that
goes on where the image almost completely disappears leaving
only gray. As the Amount slider is moved to 0 the image returns
to a normal state. I found that setting the Channel to UV produces
some beautiful results, almost a monochromatic image except that
one channel of color remains, bottom two images below.


Y 'operator' at 75 |

Red channel at 100 |
UV 'operator' at 30 |
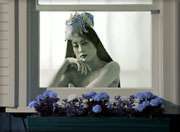
UV 'operator' at 70 |
Some Comments
These six Channel filters can produce
spectacular special effects and there are endless variations
that can be derived from each filter. Couple this with the fact
that all of the Channel attributes are Keyframeable and you can
achieve some very exciting results. They can range from the loud
and garish 'psychedelic' look, to soft mystical images with ethereal
colors. I want to point out that you will get the best results
if you use a number of filters together. Sometimes you have a
good effect but it will be too light or dark, so add the Brightness/Contrast
filter. The effect might be right but you want to change the
Hue of the image, add the Proc Amp filter. It is not often that
one filter will give you the look that you want all by itself.
Most FCP filters have sliders, when moving
the sliders it is possible to pass over and miss many different
looks. At either end of the slider are two small triangles, Red
arrows below. Clicking on these triangles will move the slider
in increments of one unit per click. Slow yes, but each click
will give you a different look to chose from and you won't miss
anything.

Enjoy,
--ken
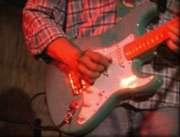
Thanks to Steve Martin for the guitar video used in this article.
copyright © Ken Stone 2001
This article first appeared on www.kenstone.net and is reprinted here
with permission.
All screen captures and
textual references are the property and trademark of their creators/owners/publishers.
|