|
   
| Tutorial: -Animating
Photos |
August, 2003
Animating
Photos
Pulling subjects
out of a photograph with Photoshop and animating them in Final
Cut Pro.
by Dale Ellis
Panning and zooming on still photos to add movement,
interest and emphasize a subject has become a popular technique
in documentary filmmaking. For a twist on this popular effect,
try separating a subject from its background in Photoshop and
then animating the elements. Here's how to do it and, in the
process, learn how to select and mask complex shapes in Photoshop:
1.
Launch Photoshop and open the image you want to work with.
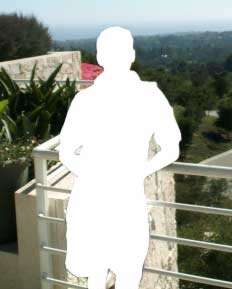
2.
A quick way to select a subject is to use the magnetic lasso
tool. The Magnetic Lasso tool can be selected by clicking and
holding down on the Lasso tool in the tools palette until the
icon menu appears or clicking the letter L on the keyboard until
the lasso with a magnet is displays in the tool bar.

Once the tool is selected, click down
and release at an edge of your subject and slowly drag the mouse
around the entire edge - the selection will cling, almost magnetically,
to the outline of your subject! If there are sharp bends along
the contour of your subject click on the mouse button in those
areas to anchor the selection line. When you get back to where
you started and the entire subject is selected press the Return
key to close off the loop of the selection.

3. Switch to Quick Mask mode to clean up the selection.
This is the small icon of a rectangle with a circle in the middle.

You should see the area around the selection
you've made become tinted red to help you identify what areas
are covered by the mask.

When in Quick Mask mode you can add or
subtract to a mask or selection by using any of Photoshop's paint
tools. Painting with black will add to the mask and white will
subtract from the mask.

4. Switch out of Quick Mask mode. You should see your
new, refined selection outlined by a marquee.

You may want to experiment with feathering
the edge of the selection by 1 to 3 pixels to create a less harsh
edge to your selection. After doing all of that work getting
the selection just right, you may want to save your selection
with the menu Select > Save Selection.
5.
Next we're going to either copy or cut out the selection that
we've made and place it on another layer. Cutting out the selection
and filling in the blank area will make it easier and give you
much more flexibility when you animate it later, but you'll spend
a lot more time up front in Photoshop filling in and camouflaging
what you removed. Copy the selection (Edit > Copy or Command-C)
or cut it out (Edit > Cut or Command-X.)
6. Create a new layer and paste the selection (Command-V)
onto the new layer.
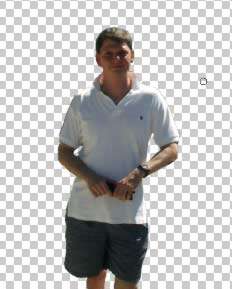
If you chose to cut the image out in
the last step you'll need to return to the first layer and use
a mixture of Photoshop's paint and repair tools, like the Clone
tool, to fill in the blank area.
7. Save
the image. If necessary, you may need to change the proportion
of the image for non-square video pixels by reducing the height
to 90% of the original with Image > Image Size.
8.
Open Final Cut Pro.
9.
Import the Photoshop file you just saved.
10.
Double-click on the imported file to open it in its own timeline
11.
Copy the desired layers (tracks) of the clip and paste them back
into the main timeline.
12.
Animate the layers with keyframes.
Of course, you'll need to work with photos
that are a higher resolution than the video or film frame you're
working with in order to give yourself room to pan or zoom. If
you have to do a lot of work in Photoshop separating elements
from their backgrounds, you may want to invest in a plug-in like
Corel's Knock-Out or Extensis' MaskPro.
These pan and zoom effects look best
with small, subtle movements applied to the elements. Large or
fast movements look comical.
Experiment with different types and amounts
of movement to get different effects. For instance, to create
the effect of a dolly shot in an arc in front a subject, move
the subject a little in one direction and the background in another.
To create a Hitchcock-like zoom, enlarge the subject a little
while shrinking the background.
With some practice with Photoshop's color
correction and noise effects, you can even use a subject from
one picture and a background from another. A quick trick to make
elements from two entirely different images look more similar
is to convert them to black and white.
If you really want to create a unique
look with this effect, you can also bring the pictures you've
edited into a program with 3-dimensional capabilities like Boris
Red or Adobe After Effects and add lighting and perspective effects
to the different layers. This is how the still photograph elements
were animated in the documentary about Producer Robert Evans'
life "The Kid Stays in the Picture."
NOTE:
This tutorial was demoed at the July 03 lafcpug meeting and is
available on the July DVD.
copyright © Dale Ellis
2003
Dale Ellis is a multimedia producer here in Los Angeles. Dale has a BA in TV and Film from Wayne State University in Detroit, has taught multimedia authoring and computer animation at Mt. San Jacinto College and Cal. State University Long Beach and was an interactive project manager in Silicon Valley. You can see samples his work at http://www.ellismultimedia.com.
|