By Ken
Stone
I have been working in
iDVD 2 for sometime now. I created DVDs for some of my customers,
mostly artists. Using their original art work for all backgrounds
and buttons, it was possible to give iDVD 2 a unique look. Always
keeping run time under 60 minutes, the iDVD 2 MPEG 2 encoding
did an excellent job. Burned about 60 DVDs (Apple brand media),
never a misfire during burning and the DVDs played on DVD desktop
units and computers with no problems. Robust and stable the only
thing wanting are some new, more advanced features.
When iDVD 3 was announced I was ecstatic.
With new features, including Chapter Markers, a good application
was going to become much better. Alas, this is not the case.
iDVD 3 shipped with several bugs that have hobbled this new version
of iDVD. Some of the features that worked in iDVD 2 do not work
in iDVD 3.
First I'll take a look at the new features
in iDVD 3 and then I'll detail what is not working properly.
New Features
Chapter Markers
Probably the most anticipated new feature is Chapter Markers
which iDVD 3 now recognizes and can utilize. Until now it was
only possible to have Chapter Markers when working with DVD Studio
Pro. Chapter Markers can be created in FCP, FCE and iMovie and
be brought into iDVD 3, embedded in the movies. With Chapter
Markers it is possible to move from scene to scene, via the remote
control with desktop DVD players or by using the Chapter submenu
that iDVD will automatically create for you when it detects chapters
markers that have been set in FCP.
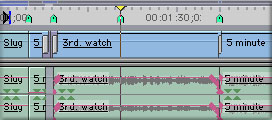
In FCP place your playhead at the
position on the Timeline that you want to mark as the start of
a scene. Now tap the 'm' key on the keyboard twice to set a marker
and open the Edit Marker window. In the name section enter the
name of the scene remembering that this is the name that will
appear in the iDVD chapter submenu in your finished DVD. Next,
click on the 'Add Chapter Marker' button, this will set the chapter
marker and will enter "(CHAPTER)" into the comment
box. Leave this exactly as it is as this comment is needed for
the process of embedding the chapter markers, if you change this,
Chapters will not work. Click okay and move your playhead to
the next position and repeat the process. There is a limit of
36 Chapter Markers, if you use more iDVD will not accept your
movie.

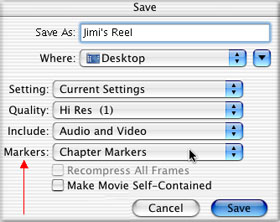
Once you have set all your markers, set
an in and out point on your Timeline and from the File menu >
Export > Final Cut Pro movie. In The Save dialog box set the
'Markers' drop down menu to "Chapter Markers", red
arrow below. Then click Save. You are now ready to drop your
FCP movie into iDVD.
Before bringing your movie into iDVD
go into iDVD Preferences. The first thing I always do is turn
off the Apple logo watermark. Uncheck 'Delete rendered files
after closing a project', below left. This will ensure that when
you return to your project you will not be required to re render
(read re encode) your project.


In the Movies section of Preferences,
above right, "When Importing movies", I have selected
'Ask each time'. I do this so that when I import a FCP movie
that has Chapters I will know that iDVD has detected the Chapters
correctly. Each time you import a movie with Chapters you will
be asked. If you decide that you do not want Chapter Markers
in your iDVD simply select 'No' and the markers will not be imported
with your movie.

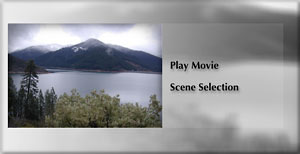
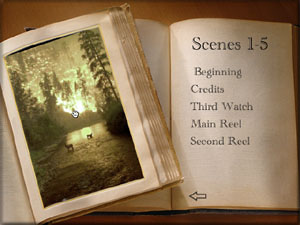
If your iDVD page is empty when you place
your movie in the iDVD interface, iDVD will add two items on
the page. 'Play Movie' and 'Scene Selection', shown below left.
Clicking on Scene Selection will take you to the first Scene
Selection submenu, shown below right. In my example there are
only 5 scenes, however, each submenu can hold up to 6 scenes.
If your movie has more than 6 scenes (Chapter Markers) then iDVD
will create additional Scene Selection submenus, with 6 scenes
per page for a total of 36 scenes. When there are additional
submenus, iDVD will place forward and back arrows for navigation.

If you already have items on your iDVD
page, Slide Shows, Folders or other movies then iDVD will place
just the name of the movie, which when selected, will take you
to a new page that will show 'Play Movie' and 'Scene Selection'.
Themes
iDVD 3 has added a number of new themes. These new themes are
more sophisticated than themes found in earlier versions of iDVD
(older themes are still available). Not only are these new themes
more professional looking but several have motion menus which
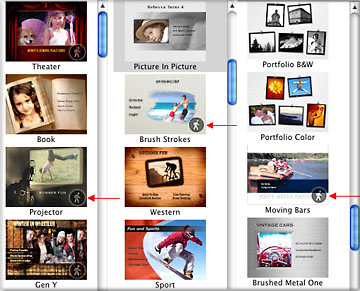
add to the over all look of the DVD. Shown below are some of
the 24 new themes. Motion menu themes have a small circular icon
denoting motion, red arrows below. Some of the themes have their
own music which you can use, delete or replace with your own
audio.
As with iDVD 2, you can drop movies or
stills onto the theme. When working with movies they will play
in a continuous 30 second loop although you can shorten the duration
of the loop if you chose. With the Projector theme, shown below
left, your movie plays on the screen in old fashioned sepia,
complete with dust and scratches. As the project reel spins it
is accompanied by the sound of a running projector. The Book
theme, below right, is very handsome. The quality of the themes
art is excellent, really very good. There are other exciting
motion menus but, there is no way that I can grab screen shots
of them to show you. It is exciting to have motion 'on' the menu
and have a movie playing 'in' the menu as well.

If you look at some of the sample themes
shown above, you will see that any art used in a theme is placed
into a type of frame. Be it a projector screen, a book page,
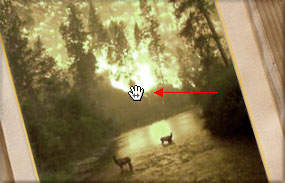
or boxes. If you turn on 'Show Drop Zones' in the Preferences,
as you drag your art onto the iDVD interface, the area for the
art will have a black and yellow boarder showing you where to
drop your art, below left - red arrows. A grabber tool, shown
below right, is provide to reposition your art inside the borders.
A great little feature but too limited in how far you can move
your art.

iHub and other enhancements
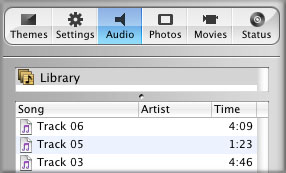
At the top of the Customize Window you will find Audio, Photos
and Movies tabs. You can access any files that you have in iTunes,
iPhoto or iMovie from inside the iDVD interface. Simply click
on any item listed and drag into the iDVD interface.
By checking the 'Always add original
sideshow photos to DVD-ROM' box found in Preferences, below left,
you will be able to include your source images as standard image
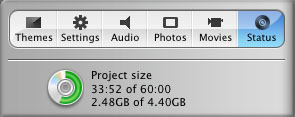
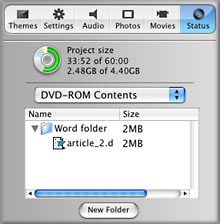
files on your DVD. The Status tab of the Customize window, below
right, now shows project information, both time and size of the
project are displayed. A very helpful addition.

Along with your movies and slide shows
you can also use your DVD as a DVD ROM. This is to say that you
can place any data files on the same DVD as your movies. Word
Documents, PowerPoint, PDF, any data files can be included. To
add data files to your DVD first click on the Status tab and
then select "DVD-ROM Contents from the drop down menu. Click
on the new folder button at the bottom and name your folder,
then drag any files you want into the folder.
What Happened
in testing ?
Custom Art and Poster Frames
If you want to use custom art for backgrounds, you will run into
problems. Place a still on a page for a background, leave that
menu page, come back and the still image could be gone. Make
your own button art, leave the page, come back, gone. The same
with Poster Frames. After setting a poster frame, upon returning
to that page you may find that your Poster frame has reverted
to the first frame of the clip. So the possibility of creating
a custom DVD is problematic.
Encoding Problems
Once you have finished building your DVD you would think that
you could click burn, load up a blank DVD, let iDVD encode and
then burn, a process that can take several hours. This would
be a mistake. One of two things will happen. Either it will spit
out a unburned DVD midway through the process or it will hang
during the burning process, spinning wheel of death. You will
have to 'force quit' and you will have a ruined DVD. For the
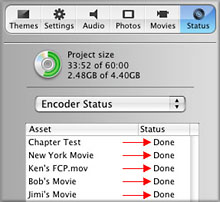
best chance of getting a good burn you must wait until all the
encoding has been completed, as shown below, then click on the
burn button, insert your blank DVD and start the burn process.
Even using this 'wait to burn' process, some are still unable
to get a properly burnt DVDs. Even when you get a good burn,
the progress bar which sits at 'about 2 minutes' for about 30
minutes will still say 'about 2 minutes' even after the burn
is done and the DVD has been ejected. Go figure. There was some
hope that the new Mac OS, 10.2.4 upgrade might solve this problem,
but early reports show no change with the encode and burn problems.
Chapter Markers
Chapter Markers do work as detailed above, but one element or
option is missing. When you are in a Chapters submenu and click
on one of the chapters, you are taken to that chapter and it
plays. When the chapter is done playing it will then continue
to play through all the remaining chapters on that submenu and
then return you to the submenu. There should be a way to have
iDVD return you to the submenu upon completion of the selected
chapter. This should be an option.
Page and Chapter Links
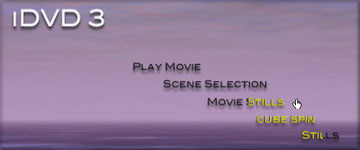
Another problem with iDVD menus. In iDVD we have the ability
to position our links where ever we want on the page, 'free position'.
This works fine and displays properly on the Mac but once burnt
to disk the links no longer display properly. As you scroll up
and down the links, several different links will be lit up at
the same time, but just parts of the links. Hard to tell which
chapter you are on.
Loss of Audio Sync
It has been widely reported that movies created in iMovie 3 will
lose audio sync after being burnt to DVD. There are several workarounds
for this problem. Movies created in FCP have no audio sync problems
when burnt to DVD.
Conclusion
iDVD is a powerful program, very well conceived. It enables us
to author and burn DVDs right on our desktops. It is Mac 'drag
and drop', yet versatile enough to allow us be creative in the
design of our DVDs. I am a big fan. But there are issues. So
what to do? Like many, I have reverted back to iDVD 2 to do my
commercial DVDs for my customers, (iDVD 2 authoring
article). If you have not yet ordered iLife for $49, wait. Apple
had to know about these problems, so it begs the question: "Why
did Apple ship this product"? Between not being able to
customize the look of your DVDs and the problems with the actually
encoding and burning process, I only wish that I could say:
Enjoy,
--ken
copyright © Ken Stone
2003
This article first appeared on www.kenstone.net and is reprinted here
with permission.
All screen captures and
textual references are the property and trademark of their creators/owners/publishers.