| Review -G
Filters for FCP - Set G1 |
September, 2003
Special
Effects Filters for Apple's Final Cut Pro 3 & 4
Filters,
Transitions and Generators
Download price $30.00
G
Filters for FCP - Set G1
By Graeme Nattress
Review by Ken
Stone
As FCP grows in popularity and usage we
are seeing more and more third party support. There are now a
number of players selling plugins for FCP. While each of these
different vendors offer many similar types of plugins, it seems
that each package has a few unique plugins that make the package
worthwhile. Such is the case with G Filters.
How many times have you read an
inquiry at one of the FCP boards asking how to achieve the "Indiana
Jones moving line across a map effect" (well, something
like that). The reply was always about the same; create the line
in Photoshop and composite over a map then keyframe a crop to
reveal the line over time. Sheesh, what a chore. Graeme Nattress
has address this need with his 'G Lines' generator.
The 'G Lines' generator is flexible,
well though out and easy to use. At the start you decided how
you want to have your line revealed as the clip plays out. Setting
the first option to 'Speed' will draw the line at a constant
rate that you can control. Set to 'Percentage' allows you to
keyframe the draw of the line. There is a is Type parameter which
provides the option of either a straight line, from point to
point, or a curved line. With curved you have control over the
shape of the curve by using Curve Resolution. You can also set
the thickness and color of the line. There are also 'Head' clip
parameters which we will get to in a minute.

To use the G Lines generator, place on
the Timeline over a map or other art work, this generator can
set up to 16 points which may be more than you need. At the top
of the 'Vertices' section, select the number of points that you
want to work with. You can change this number at any time if
you need to add more points. At the bottom of this section is
a Labels box, which will number each point for reference. To
view the line as you work set 'Percentage Draw' to 100. Now,
click on the Point 1 "+", then click in the Canvas
window to set. Click each consecutive Point number and set in
the Canvas to build your line. You can go back to any Point number
and re position at any time. To keyframe, move the playhead to
the first frame and set 'Percent Draw' at zero and set a keyframe,
move to the last frame of the clip and set to 100, keyframe.


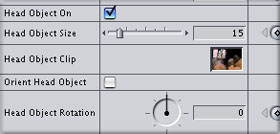
There is another cool feature about this
generator. In the 'Head Object section there is an image well.
You can drop art work into the image well, either a still or
video clip (that will play) at the head of the line. You can
keyframe the size of the art and even keyframe rotation. The
Head clip also works with an alpha channel so you can turn on
the "drop shadow" in the Motion Tab for added effect.


Set G 1 is a nice set of plugins for FCP at a reasonable price,
with a total of 17 effects. Included with the G Line generator
are:
Transitions
Filters
- G Alpha Expander
- G Aperture Uncorrect
- G Beauty
- G Cool Blur
- G Deflash
- G DVNR
- G Field
- G Levels
- G Monochrome
- G Nice
- G Saturator
- G Super Levels
- G Tint
You can visit the G
Special Effects Filters web site to see demos of Set G 1.
Also at the site is a PFD doc with instructions and four free
plugins. Take a look.
Free
- G Blur Dissolve
- G Take
- G Earthquake
- G Speed
Enjoy,
--ken
copyright © Ken Stone 2003
This article first appeared on www.kenstone.net and is reprinted here
with permission.
All screen captures and
textual references are the property and trademark of their creators/owners/publishers.