I
know than this is going to sound crazy, but I actually like Compressor.
I spent some time with Compressor 3, when it first shipped, learning
the new interface and then went about my business using it as
usual.
Ripple Training just released "Up
and Running in Compressor 3" by Brian Gary. Being a fan
of Ripple Training tutorials and wanting to take a refresher
course in Compressor 3, I decided to take a look. This is the
first tutorial released by Ripple that is only offered as a download
and weighs in at 645 MB. The download version is of the same
high quality standards as the tutorials by Ripple released on
DVD. In addition to the full screen version that plays on your
Mac, you can also download a full Apple TV version, which is
included in the price. After downloading the tutorial, I burnt
it to DVD so I have a backup and can move it between Macs if
I need to.
With a run time of just under two
hours this tutorial consists of 10 chapters:
- The Good, the Bad and the Uncompressed
- Importing Source Media
- Working with Settings
- Working with Destinations and
Droplets
- Maximizing Batch Workflows
- Previews, Test Clips, and Markers
- Working with Geometry Settings
and Actions
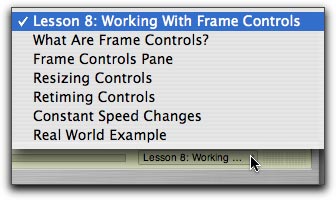
- Working with Frame Controls
- Working with Filters
- Creating a Virtual Cluster
Each chapter is divided into sub-chapters.
All lessons have chapter markers making navigation of the tutorial
easy.

This tutorial is of the 'sit back
and watch' variety and it's a very good show. The on screen video
is of high quality with excellent graphics to help reinforce
the lessons offered. Like Brian Garys' previous tutorial, "The
Art of Encoding Using Compressor", it is obvious that Brian
knows Compressor and his comfort level translates to easy, evenly
paced, friendly lessons. Compressor is highly technical in nature,
it's not 'sexy' like Final Cut Pro or other Pro apps, but still,
Brian does an excellent job of making the entire tutorial enjoyable.
He even makes the terminology and technology of Compressor understandable.
So who is this tutorial for? Certainly
for anyone new to Compressor or for people who use it but have
limited understanding and, possibly, limited success. While you
can drag video into Compressor and select an encoding Preset,
there is much more to Compressor. It is very important to have
an understanding of what is really going on and how to control
all of the options that make Compressor such a powerful tool.
For the beginner, the lessons are clear and concise and move
through all of the different elements of Compressor, step by
step, working a compression job, from start to finish.
I do consider myself to be experienced
with Compressor, but I learned a lot from this tutorial. Compressor
3 underwent a major overhaul and was given a new interface, features
and abilities. Many of these I discovered viewing the tutorial.
There are a few features I learned about that I wish I had known
about earlier (i.e.- how to use the History window to restore
a compression job - wow). Even for people who have experience
with Compressor, there are lessons to be learned.
This tutorial correctly tackles
a topic that has long been a source of confusion. I'm talking
about Compressors Preview window. Brian does an excellent job
of telling us how it works, how to use it and exactly what the
Preview window can and can not do. It is limited.
Another area of Compressor is properly
illuminated. At a number of discussion boards, people report
that when doing Standards Conversions, changing the frame size
or frame rate of video from one format to another, they are unhappy
with the poor results that they get. After all, Compressor now
employs 'Optical Flow' taken from Shake and Optical Flow is capable
of producing very high quality Standards Conversion, so what's
the problem? Well, for starters, Optical Flow is not turned on
by default, you need to enable it. Brian covers Frame Controls,
which houses the Optical Flow feature. After viewing the 'Working
With Frame Controls' lesson, you will know how to use this feature,
what settings to employ and which setting to stay away from.
Using Optical Flow properly can make a huge difference in output
quality.
There are a number of other areas
of importance to the experienced user throughout the tutorial.
In dealing with the Geometry pane, Brian goes to great effort
to explain what is really going on, and the interrelatedness
of crop, scale and output dimensions, etc. Other advanced areas
include such things as setting up Virtual Clusters on a 8-Core
MacPro and the Batch Workflow's chapter shows you how to manage
your jobs, use Batch templates, and optimize Compressor to process
repetitive tasks.
When learning FCP, you can start
with basics and over time, learn new features and abilities,
ever increasing your knowledge base. However, learning Compressor
in this manner is not advised because you need a full grasp of
the tools and workflow options available to you in order to achieve
the highest quality output. "Up and Running in Compressor
3" by Brian Gary will help you achieve this goal.
Enjoy,
--ken
copyright © www.kenstone.net
2008
This article
first appeared on www.kenstone.net and is reprinted here
with permission.
All screen captures and
textual references are the property and trademark of their creators/owners/publishers.