|
|
   
| Tutorial: -Working
with BWF Audio in FCP |
March, 2006
Working
with BWF Audio in FCP
by Clay Coleman
If you haven't been confronted with it previously,
.BWF (Broadcast Wave Format) is an audio format initially
developed under the auspices of the European Broadcast Union
around 1996 as a non-proprietary 24 Bit Integer audio file format.
The original intent was to provide broadcasters within the EBU
with a simple, high-quality, tapeless digital audio platform
to streamline workflows for the member countries. Since adding
TimeCode and MetaData functionality in 2000, it has become a
widely-used format for hard-disk digital audio recording for
radio, television and film. Using a BWF recorder, like the Sound Devices 744T, and a simple file conversion
tool, the BWF2XML file converter, BWF allows for extemely fast
audio capture in excellent quality with multiple tracks simultaneously,
and while retaining original timecode and filenames for later
synch to picture and audio post workflows.
Interesting thing is, BWF was made QuickTime
compatible somewhere around 2002, but for whatever reason, that
fact never made it into the FCP or QuickTime documentation. BWF
audio is still not mentioned in the FCP Studio manual (as of
2006), and that is something Apple should definetly change in
future versions. In fact, if you had a version update request
something along the lines of "hey, how about giving us really
good digital audio with instant multi-track import and with original
timecode, and in PAL, NTSC, and 24, and how about with a simple
way to maintain shot, scene and take numbers, and please make
the workflow completely tapeless, etc., etc.", well, wait
no longer. It already exists. Those in the know have been using
BWF for some time now. I came across it recently when a recordist
on a recent job sent me his workflow specs. After then posting
a query on the lafcpug forum, I was clued in pretty quickly.
The rest was a bit of research, a few tests, and then using it
on the current job. Thus the impetus for this beginner's how
2, and in hopes that BWF audio comes into much wider use, because
it's an editor's dream.
The Gear:
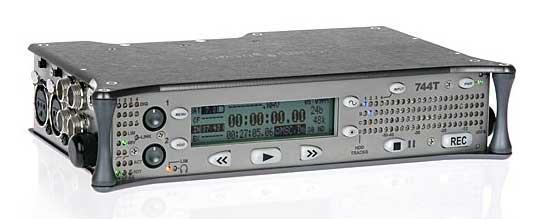
This is the Sound Devices 744T deck,
as was used during shooting. Up to four tracks of BWF audio can
be recorded to it's internal 40 GB drive simultaneously. How
much audio (in hours and minutes) you can get onto the drive
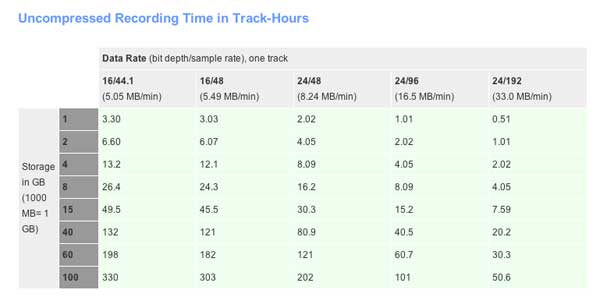
of course depends on the settings used. The chart below from
the Sound Devices homepage gives you the general idea of storage
requirements for one track of audio at the various settings availalbe.
For example, recording at 24 Bit / 48K, the 744T would allow
you about 20 hours of 4-Track audio. More than ample for a day's
shooting.
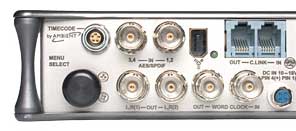
On the 744T's right side panel, you'll
notice the Firewire 400 port. It's both Mac and PC compatible
(OSX), and allows connection directly to your computer. The 744T's
internal disk mounts as an external drive on the desktop, letting
you copy BWF files straight from the deck to your media drive.
For editors though, one of this deck's
handiest features is the ability to enter individual filenames
of up to 9 Digits. For example, we opted for a standard scence,
shot and take number routine, thus allowing for filenames like
03-07a-5 (Scene 3, Shot 7a, Take 5) as per the director's breakdown,
and as subsequently slated. Once set, those filenames are maintained
from recording all the way through edit and post. A major time-saver,
streamlining the otherwise tedious job of logging and capturing
audio down to a few mouse-clicks.
Getting .BWF Files in:
Step one
in importing and converting .BWF audio is to get the orignal
files copied to a designated media drive on your machine. As
above, you can pull it right off the deck via Firewire, but in
most workflows, you won't have (or even need) the deck in the
edit bay to import from. More likely, you'll get the material
from the audio dept in the .BWF file format. In this particulart
case, I was given a Data DVD with all the audio files, so bringing
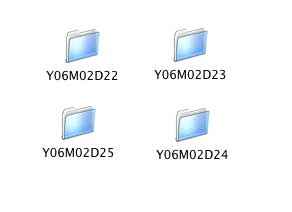
it in was just a matter of drag and drop. Folders were created
for each shoot day, a procedure to retain as will become evident,
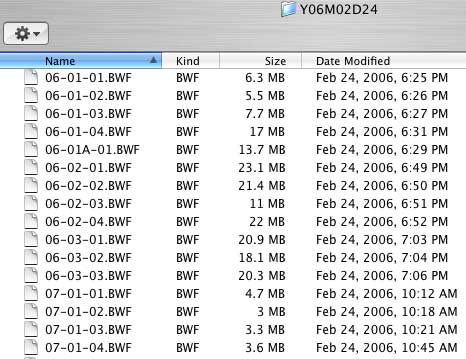
and saved to the project's media drive. Popping open a folder
as below, you'll see the individual file names appear with the.BWF
suffix, file size, and date modified info. As advertised, each
audio take is displayed as the recordist named it during shooting
by scene, shot and take numbers.
|
Original folders:
|
Sample contents:
|
Converting and Saving the Files via
BWF2XML:
Step 2:
to start the conversion process, you need to purchase and install
the BWF2XML
tool. Details on how to do that are at the end of this
article. Once in your applications folder, the converter icon
shows up as below. Double-click to launch.
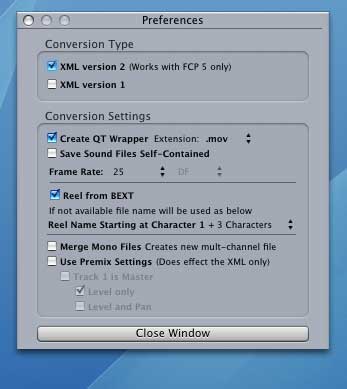
You then get the BWF conversion dialog
window:
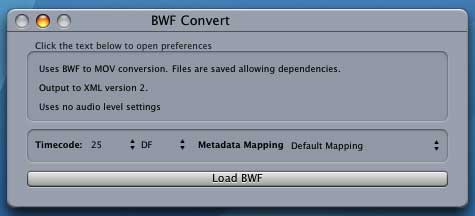
At this point there are 2 choices, either
hit the Load BWF bar to proceed with the conversion at the current
settings, or go into preferences to fine tune things. Prefs are
accessed by simply clicking in the text area (which opens an
additional preferences pane) and by heading up to the menu bar
and adjusting further settings there.
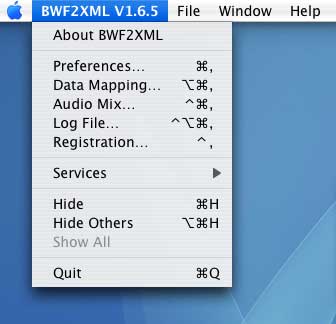
A number of very useful features are
available, including being able to generate a log file. A 12
channel audio mixer let's you make volume and pan adjustments
prior to conversion. (Hang on, twelve channels? Yes, but for
the moment, just to keep things simple, I'm sticking with up
to 4. More on multichannel towards the end of this piece.) Video
frame rates of 23.98, 24, 25, 29.97 and 30 fps are supported,
as well as the more exotic 29.97 DF vs. NDF issues which can
arise when synching 29.97 audio to telecine. A word on that later
too.
 |
 |
It would take too long to go into all
the details of each setting here, but suffice it to say that
after testing the main functions, everything works as it should,
and the Help documentation is simple and straightforward. To
convert the files at hand, I set the timecode to 25 (my timebase
is DVCProHD/1080i50), hit the "Load BWF" bar, set a
destination folder, and started a batch conversion of each shoot
day's files (yes, you have the option of grabbing individual
files or an entire batch). The converted files in one of the
new folders (each folder was named BWF Conv plus date), look
like this:
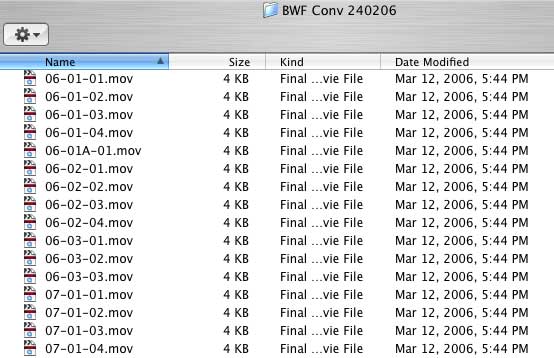
The first thing you'll notice is the
very small and continuous (4KB) file-size displayed for each
take. That is because although they are defined as FinalCutPro
Movie Files, they are actually links between the BWF format and
QuickTime via an XML file that is generated during conversion.
The XML file enables retention of each files' MetaData, keeps
the tracks separate, and an XML file for each conversion is saved
to the destination folder.
Important: this is where you've got to
exercise some caution, because once converted, these file links
can now be imported into FCP and edited and played back just
like any other audio files, but, they can't be moved from the
their current location without potentially becoming corrupted.
They also can't be copied to a different drive for the same reason.
However, there is an easy fix to that problem, which I'll get
to in a second.
Importing into FCP:
Step 3:
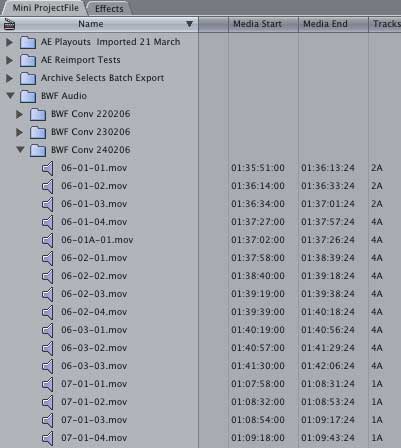
to get the converted audio into FCP, just import files or a folder
as required in the usual manner. In the FCP browser, each file
shows up with the original scene, shot and take number, with
the original timecode, and displaying how many tracks each file
includes:
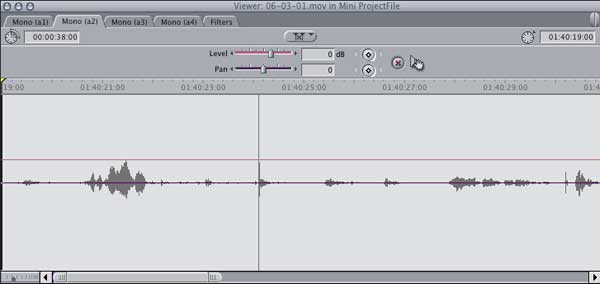
As to be expected, when opening a clip
in the viewer and with the playhead set at the head as below,
you then see each track within the clip, the audio waveforms,
duration, original timecode and original filename. Very, very
cool.
From there, it's just a matter of getting
onto the timeline to synch to picture. In this case we did it
the old way, lining up slates with waveform peaks. If you have
timecode from camera into the BWF recorder (which the 744T can
do), then of course you'd have the added luxury of simply lining
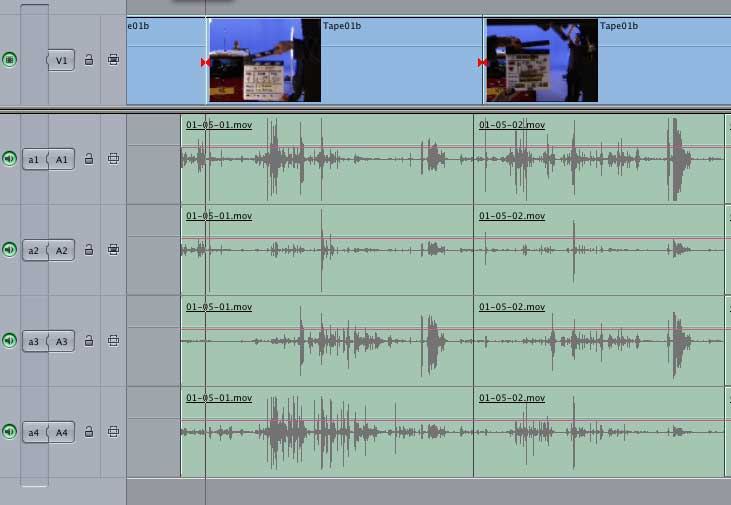
it up by TC. Here's a few 4-Track clips, recorded with various
boom and radio mics, after editing into the timeline for synch
to slates:
Backing Up to QuickTime:
The only other thing you really should
do is Batch Export those converted files from the browser as
QuickTime .mov files with Audio Only. Edit with those, and keep
the original .BWF's and the 4KB converted files as backup. You
can then move the new QT .mov files around to other drives if
need be without them becoming corrupted. And yes, the exports
do retain all the separate tracks, the original filenames, and
the original TC, so there's no reason not to take the safe route.
At this point you're probably wondering
what happens if you open a .BWF file with QuickTime or Compressor
without doing the conversion. QuickTime is .BWF compatible, so
you can hear the audio in the QT player, and you can export to
.mov or .aiff. Only thing is, it's then maximum 2-Track and you
lose the original TC. If you import a .BWF file into FCP directly,
it will display all the tracks and you can playback and edit
the clip, but again, the original TC is gone, and any attempts
to export starts creating a lot of error messages. Therefore,
the BWF2XML tool is essential to making the workflow run smoothly
and with all functionality fully operative.
Bottom Line:
And that's basically it. Although the
workflow via XML and then to QuickTime involves an extra step
or two, the conversion goes so quickly that it doesn't really
matter. In this case, audio from a four day studio shoot amounted
to just over 300 takes, or about 3.2GB. The initial conversion
via the BWF2XML tool went off within two minutes. Importing into
FCP and then Batch Export to QuickTime took about 4 minutes on
a dual 2.5 G5. Not an issue, especially when compared to capturing
DAT audio real-time, or having to make second passes of camera
audio in real-time to get all the tracks, plus the logging hassle.
A bit of good file organization is all that is otherwise required.
Another added benefit of backing up to
QuickTime from the converted files, is that one can of course
send the audio to a Soundtrack multitrack project, or export
to .omf for further sweetening and mix at an audio facility.
There are numerous very good reasons for using external audio
both for film and video, the main one being that the camera is
often nowhere near where mics want to be, thus involving extra
cables and gear hanging off the camera for people to stumble
over and fumble with, which DP's generally despise. The recording
quality depends largely of course on the skill of the recordist
and the mics used, but in the hands of a competent person, .BWF
is an excellent low-cost high-end solution. Also for the editor,
who, with literally just a few mouse clicks, is spending less
time on the drudgery of log and capture and more time on the
important part.
The Bigger Picture:
As regards 5.1 and 7.1 recording, editing,
and mixing is concerned, .BWF is already in use in that arena
too, and that's the reason why the conversion tool currently
has a 12 channel mixer on board. A .BWF file can contain 12 or
more tracks of 24 Bit audio. Theoretically, the number of tracks
is unlimited. It's currently a hardware issue to handle that
much throughput to disk, but the format can already deal with
it. On a multi-camera shoot, 12 or more channels of audio is
not uncommon. In the future, we'll be seeing machines that can
record multiple tracks, while saving to one multi-channel .BWF
file. Therefore, although video has taken the limelight recently
with the jump to HD, the audio world has not been asleep at the
switch. Far from it. Great new possiblities are already here
with more to come in the very near term.
The .BWF file format is certainly something
FCP users need to at least know about. Imagine working in DVCProHD
on P2 with .BWF 24 Bit external audio. No tape, no decks, modest
file sizes, no expensive storage solutions, excellent qualtiy,
and instant compatibilty with all the FCP Studio apps. A true
tapeless post solution. Let's get all that into the FCP Studio
Manual.
Contributors:
Many thanks to Andreas Kiel at
Spherico.com,
the rocket scientist who developed the BWF2XML tool. Available
for $95 in the lafcpug store, it's very fairly priced,
especially when you consider the time-savings involved. Andreas
also provides support for various film and video workflow solutions,
and is experienced in dealing with longform projects as well.
Should you get stuck with 29.97 DF/NDF audio synch to telecine
problems, the converter can handle it. Andreas can tell you how.
Contact him directly too for any customizing needs.
Thanks also to David Urban, the
recordist on this job, who gave me a few test files to play around
with prior to shoot, then generally explained how it all works
and took me through the converson procedure first time around.
Very helpful.
Further thanks to Jon Tatooles,
one of the founders at Sound Devices. Their 744T is a great
piece of gear, very innovative, easy to get into, very robustly
built for field use, and thus highly recommended. The ability
to enter scene, shot and take numbers as individual filenames,
and thus retain that information all the way through post, is
an excellent feature.
Resources:
Want more tech? The following links will
get you started:
The European Broadcast Union's .BWF spec
page with Userguide and FAQ:
www.ebu.ch/en/technical/publications/userguides/bwf_user_guide.php
Sound Devices Homepage with Gear, Descriptions,
Specs, and PDF's
www.sounddevices.com
The BWF2XML conversion tool Developer's
Homepage:
www.spherico.com
Hope this helps,
Clay Coleman
Oasys Editing
Munich
All images used by permission.
/ © 2006 Clay Coleman
Clay
Coleman is a free-lance FCP editor since version 2.0. Oasys
Editing is his home base in Munich. Projects there include work
for TV, Corporates, Short Features, and Docus. Clay also teaches
DV filmmaking at Munich's Graphic Arts Akademie U5.
|