September, 2002
Fun with Batch Exporting
by Nick Meyers
Introduction
Call me old fashioned, I like Batch Export. It doesn't have too many Bells and Whistles, like Media Manager, and it doesn't promise the world. But it's got a kind of reliable functionality, and it does work.
There are three main things I have used Batch Export for over the years (all 2 of them)
1.
Compiling Stills,
2. Exporting Audio Tracks,
3. Converting Subclips into Self-Contained-Clips.
There are some functions Batch Export offers that I have never used, like the naming options, or altering the render quality, so I can't comment on them other than to say they might be useful to someone else, or to me sometime in the future. But for now....
BATCH EXPORT - stills
Often directors ask "can we get a still of that?" Here's how to streamline the process.
Make a new bin called "Stills for Export" or "shots for Stills" or whatever works for you.
Whenever you happen to park on a frame you or the director think will be a good still, drag it straight to this bin.
You can drag direct from the viewer. If you've spied it from the canvas, you either have to hit "F" to load the shot into the viewer, or if it's a composite, or effected shot, make a freeze with Shift N, and drag that into the bin.
As soon as you've dragged it into the
bin, rename it, giving it a specific name.
We're going to be batch exporting these, and you may well pick
several frames from the one shot. Batch export will then ask you
to change them, and you won't want to have to think about it then.
Now is the time to name the chosen frames.
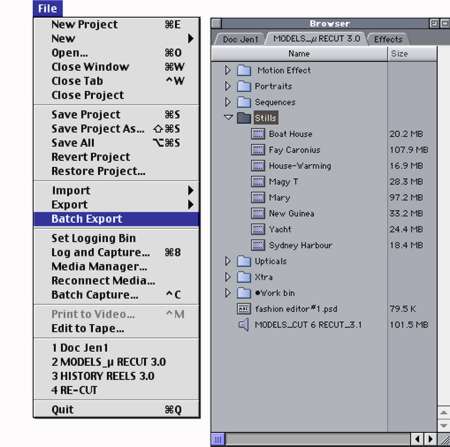
OK it's the end of the day, or session, it's time to export your stills. There's always a multitude of ways, heres one:
Here's another:
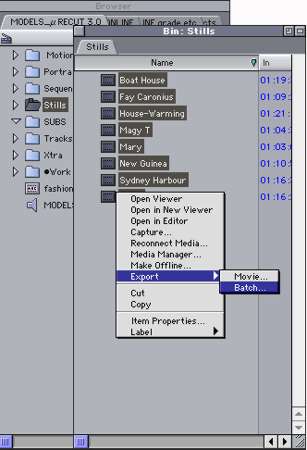
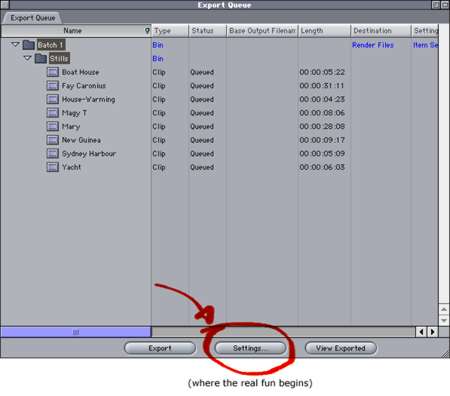
The Batch Export window will now open
In Batch Export, go to Settings. (Button at bottom of window)
That's it really. That's all you have to do.
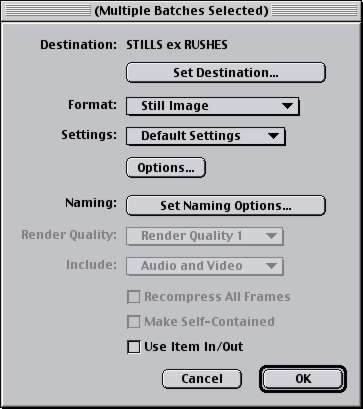
If you want more than one format, just re-select the bin in the browser and hit Batch Export again. You'll now have two Batches waiting to go in the Batch Export window, and you can apply different settings to each. Hit export, and all the frames you have selected will be processed.
OK, one thing I've left out is the de-interlacing.
With this set-up, you'd have to de-interlace in your graphics
editor. You can then choose upper or lower on a case-by-case basis,
which I reckon is the way to go.
Otherwise you can add de-interlace filter to the shot while you
have it in the viewer, but that slows things up a bit for my tastes
BATCH EXPORT - busting subclips
Sure you can use the Media Manager for
this, but then again, why should you?
Everyone complains about it. Batch export is pretty straightforward.
Also there's a couple of advantages with Batch exporting your
subs that you might not have considered....
OK, you've captured a whole tape, maybe used scene detection and dragged the subs to the timeline for logging. You've deleted the dud shots, and trimmed the others, maybe split some into even more shots. Maybe you want to turn those subs into fully fledged clips. One way is the Media Manager, "Copy" mode. Another is Batch Export.
First things first. Before doing anything with subs, don't forget to turn them back into Master Clips.
BATCH EXPORT SETTINGS:
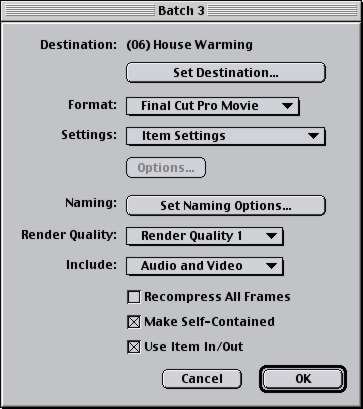
That's it. Simple as.
If you have any shot names longer than the prescribed number. of characters, Batch Export will ask you to modify them. I like this. I get to re-work the name to something I can recognise. Media Manager just drops a few characters from the middle of the name, making it hard to track down if you ever need to.
Here's a neat trick you can do:
You captured a whole tape while at lunch, but it turns out there
was a TC break.
If you didn't get any sync problems, you don't have to re-capture.
After logging etc, remove subclip limits, & Batch export the
first section with good code. Now go to the section with NG code,
and modify it to the Right code. (cross check with tape).
As all the clips actually come from one
master file, you only need to do this once.
Now Batch Export the Second lot of Clips.
N.B. you have to do it in this order. You can't set up 2 batches from one Master file as it can only have one TC at any one time.
What you DON'T get with this technique
is any logging info. That won't be part of a FCP movie. All the
relevant info needs to be worked into just the NAME of the clip.
Media Manager WILL carry all the logging info, and for a lot of
people that is important.
Just thought I'd present this method as a possible alternative, and maybe a conversation starter.
BATCH EXPORT - tracks & image for mixing in Pro Tools.
Maybe you love the way you've volume graphed
all your dialogue and music, and you're positive you won't need
any handles.
You want to get a copy of those tracks into a DAW for EQ, Compression,
whatever.
It can happen, I know. OMFs don't carry the volume info, so here's
what you'd do:
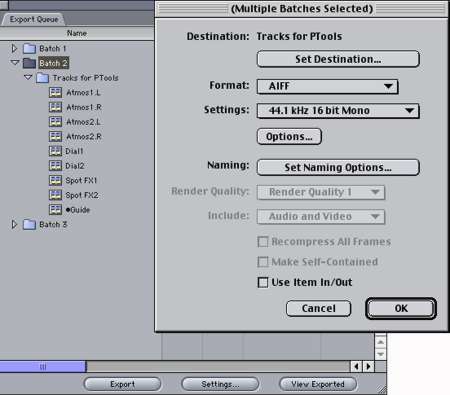
Let's say you have 8 tracks of 4 stereo pairs.
BATCH EXPORT SETTINGS for AUDIO TRACKS:
While you're at it, you're going to need a picture to mix to... might as well make that now too.
BATCH EXPORT SETTINGS for PICTURE.
These Audio and Picture files will all open in PT and sync up nicely.
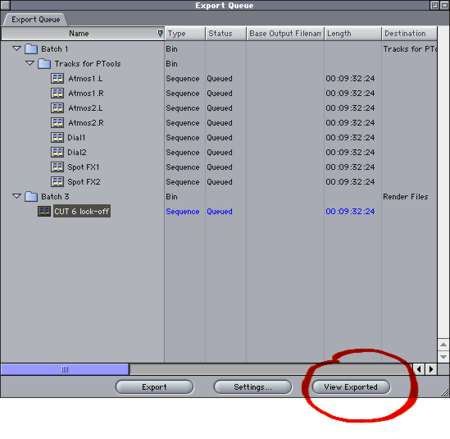
VIEW EXPORTED
This button on the bottom right of the Batch Export window does exactly what it suggests. It will open the Exported Items in FCP. Each Item opens in its own Viewer window. If you want to bring them back into FCP, and you've only exported a few Items, this is handy, but as you have to drag each one separately to the Browser, I wouldn't recommend it for a big batch.
WRAP-UP
Well that's about it. There would be all sorts of other applications for Batch export, but these are the ones I use. The great thing about it is it's "set and forget" nature. You set a whole bunch of things going at once, and come back later to find them all done. In fact you could have all 3 of these examples set up to Batch together, if you needed to. Tracks for a mix, publicity stills, and your next projects rushes. Hit Export, turn the lights off, see you in the Morning. Thank you and Goodnight.
copyright©Nick Meyers2002
Nick
Meyers has been working in film since he got a Super-8 camera
for his 13th Birthday. Worked as an Assistant editor at the Australian
Broadcasting Corporation for nearly eight years, picking up skills
and editing films for himself & friends on the side.
An experienced and enthusiastic Film Editor, he has edited many
short films and music videos, and more recently Feature Films.
He took a long time crossing over to Non-Linear, waiting for the
technology to become affordable and inclusive, yet realistically
professional. Final Cut Pro offered that opportunity.
| | Home | Next Meeting | Forum | Join | Past Meetings | Talent Directory | Reviews | Features | Tutorials | About Us | Discounts | Store |Training Classes |Contact Us | SEARCH | |